Hyak HPC#
Just keeping any useful tips/tricks/hard-fought successful build scripts I find for working with UW’s compute clusters Klone and Tillicum
GPU Klone Nodes#
In the aaplasma account we don’t have direct access to any GPU-enabled partitions, but there’s always the checkpoint partition. To simply get an interactive session for a single node with a GPU attached, we can:
salloc -A aaplasma --partition=ckpt-all --gpus-per-node=1 --mem=24G --time=2:00:00Sort of unfortunately, the nodes are a real mix of different GPU architectures, so you can’t really tell what sort of device you’re going to get that way. As of January 2026, these seem to be the different flavors available on the public checkpoint partition:
| GPU | Architecture | CUDA Arch | Klone restriction | Memory per GPU | GPU/node | # nodes |
|---|---|---|---|---|---|---|
| P100 | Pascal | 6.0 | p100 | 16GB HBM2 | 4 | 2 |
| 2080 Ti | Turing | 7.5 | 2080ti | 11GB GDDR6 | 8 | 10 |
| RTX 6000 | Turing | 7.5 | rtx6k | 48GB GDDR6 | 8 | 11 |
| A40 | Ampere | 8.6 | a40 | 48GB GDDR6 | 8 | 32 |
| A100 | Ampere | 8.0 | a100 | 40GB HBM2 | 8 | 8 |
| L40 | Lovelace | 8.9 | l40 / l40s | 48GB GDDR6 | 8 | 15 / 25 |
| H200 | Hopper | 9.0 | h200 | 141 (not allowed on checkpoint) | 8 | 8 |
To get a sense of just what these cards can do, I’ve used this exceptionally useful OpenCL benchmark demo: https://github.com/ProjectPhysX/OpenCL-Benchmark
| GPU | Compute Units | Clock (MHz) | Cores | VRAM (MB) | Global Cache (KB) | FP64 (TFLOPs/s) | FP32 (TFLOPs/s) | FP64/FP32 | FP16 (TFLOPs/s) | INT64 (TIOPs/s) | INT32 (TIOPs/s) | INT16 (TIOPs/s) | INT8 (TIOPs/s) | Mem Read coalesced (GB/s) | Mem Write coalesced (GB/s) | Mem Read misaligned (GB/s) | Mem Write misaligned (GB/s) | PCIe Send (GB/s) | PCIe Receive (GB/s) | PCIe Bidirectional (GB/s) | PCIe Generation |
|---|---|---|---|---|---|---|---|---|---|---|---|---|---|---|---|---|---|---|---|---|---|
| 2080 Ti | 68 | 1545 | 4352 | 10820 | 2176 | 0.490 | 15.753 | 1/32 | 31.114 | 3.400 | 15.274 | 12.920 | 53.973 | 535.62 | 538.19 | 491.31 | 149.62 | 4.97 | 5.04 | 4.82 | Gen3 x16 |
| RTX 6000 | 72 | 1770 | 4608 | 24021 | 2304 | 0.561 | 17.944 | 1/32 | 35.632 | 3.588 | 17.475 | 14.607 | 60.096 | 557.27 | 594.67 | 559.38 | 170.52 | 4.85 | 5.27 | 4.96 | Gen3 x16 |
| A40 | 84 | 1740 | 10752 | 45488 | 2352 | 0.575 | 35.403 | 1/64 | 36.845 | 2.848 | 18.467 | 16.685 | 64.745 | 581.17 | 549.21 | 568.02 | 177.77 | 4.57 | 4.56 | 7.10 | Gen3 x16 |
| L40 | 142 | 2490 | 18176 | 45457 | 3976 | 1.391 | 84.753 | 1/64 | 88.687 | 3.696 | 44.439 | 35.483 | 103.977 | 713.57 | 474.25 | 725.41 | 240.57 | 21.92 | 21.94 | 20.65 | Gen4 x16 |
| A100 | 108 | 1410 | 6912 | 81151 | 3024 | 9.557 | 19.234 | 1/2 | 72.486 | 2.652 | 19.416 | 17.616 | 71.156 | 1514.39 | 1804.67 | 1219.07 | 209.38 | 5.70 | 8.24 | 6.54 | Gen3 x16 |
| P100 | 56 | 1328 | 3584 | 16269 | 1344 | 3.508 | 8.634 | 1/3 | 17.573 | 1.199 | 3.119 | 8.871 | 1.765 | 544.50 | 595.68 | 303.00 | 90.52 | 10.97 | 8.96 | 9.59 | Gen4 x16 |
| RTX 3090 | 82 | 1785 | 10496 | 24575 | 2296 | 0.623 | 37.580 | 1/64 | 39.241 | 3.084 | 19.402 | 17.422 | 71.138 | 834.69 | 839.84 | 835.02 | 195.30 | 5.69 | 5.06 | 5.34 | Gen3 x16 |
(I’ve just included data for the RTX3090 in my personal desktop for comparison.)
Checking GPU availability#
The sinfo command they provide in their documentation here https://hyak.uw.edu/docs/gpus/gpu_start/#gpu-jobs will list the nodes with GPUs and their usage status, but it’s a bit hard to glance at. I’ve got a big awk command to parse it out and make it a bit easier to read:
gpucount bash command
# Show available GPU counts by type on the ckpt-all partition
gpucount() {
    sinfo -p ckpt-all -O nodehost,cpusstate,freemem,gres,gresused -S nodehost \
  | grep -v null \
  | tail -n +2 \
  | awk '
{
    # Parse GRES column: gpu:<type>:<total>
    split($4, gres, ":")
    gpu_type = gres[2]
    total = gres[3] + 0

    # Parse GRES_USED column: gpu:<type>:<used>(IDX:...)
    split($5, used_parts, ":")
    # used count is the number before "(" in the third field
    split(used_parts[3], used_num, "(")
    used = used_num[1] + 0

    # Check if node is down/offline (O > 0 in A/I/O/T)
    split($2, cpu, "/")
    offline = cpu[3] + 0
    total_cpus = cpu[4] + 0
    if (offline == total_cpus && total_cpus > 0) next

    avail = total - used
    available[gpu_type] += avail
    total_gpus[gpu_type] += total
    in_use[gpu_type] += used
    nodes[gpu_type]++
    if (used == 0) empty[gpu_type]++
}
END {
    # Sort by GPU type
    n = asorti(available, sorted)

    printf "%-12s  %5s  %5s  %5s  %5s  %5s\n", \
        "GPU TYPE", "AVAIL", "USED", "TOTAL", "NODES", "EMPTY"
    printf "%-12s  %5s  %5s  %5s  %5s  %5s\n", \
        "--------", "-----", "----", "-----", "-----", "-----"

    total_avail = 0
    total_used = 0
    total_total = 0
    total_nodes_up = 0
    total_empty = 0

    for (i = 1; i <= n; i++) {
        t = sorted[i]
        printf "%-12s  %5d  %5d  %5d  %5d  %5d\n", \
            t, available[t], in_use[t], total_gpus[t], nodes[t], empty[t]+0
        total_avail += available[t]
        total_used += in_use[t]
        total_total += total_gpus[t]
        total_nodes_up += nodes[t]
        total_empty += empty[t]+0
    }

    printf "%-12s  %5s  %5s  %5s  %5s  %5s\n", \
        "--------", "-----", "----", "-----", "-----", "-----"
    printf "%-12s  %5d  %5d  %5d  %5d  %5d\n", \
        "TOTAL", total_avail, total_used, total_total, total_nodes_up, total_empty
}
'
}
This gives us something like this, which is a bit easier for a human to parse:
[embluhm@klone-login03 runs]$ gpucount
GPU TYPE      AVAIL   USED  TOTAL  NODES  EMPTY
--------      -----   ----  -----  -----  -----
2080ti           13     47     60      8      1
a100             12     52     64      8      0
a40              78    162    240     30      2
h200              8     56     64      8      1
l40              31     81    112     14      0
l40s             83    101    184     23      6
p100              0      8      8      2      0
rtx6k            50     38     88     11      3
--------      -----   ----  -----  -----  -----
TOTAL           275    545    820    104     13
Kokkos/RAJA on Klone#
Requesting Nodes#
The CUDA installation is available on each node by loading the lmod module module load cuda.
RAJA and Kokkos are happy to compile GPU kernels for whatever CUDA architectures are supported by the cuda module. AFAICT Kokkos only lets you pick one, while RAJA lets you specify multiple architectures. We should build for the highest version that is supported by every device we might need to run on. Unfortunately, there are parts of RAJA/Kokkos that require 7.0+, so we can’t target the old P100 cards. To work around this, we can supply a constraint to our slurm command to tell it which GPUs we are willing to work with:
salloc -A aaplasma --partition=ckpt-all --gpus-per-node=1 --constraint="2080ti|a40|a100|l40|l40s|rtx6k" --mem=24G --time=2:00:00This puts us on a node that does not have a P100 card. That way we can target CUDA 7.5 and it should work for all of the other cards.
To build RAJA on Klone, I’ve used this set of commands after cloning the RAJA repo (with –recurse-submodules):
module purge
module load cuda gcc/13.2.0
cd /gscratch/aaplasma/embluhm/tools/src/RAJA
mkdir -p build
cmake -B build/ -DCMAKE_INSTALL_PREFIX=/gscratch/aaplasma/embluhm/tools/RAJA -DRAJA_ENABLE_CUDA=ON -DENABLE_CUDA=ON -DCUDA_TOOLKIT_ROOT_DIR=/sw/cuda/12.4.1 -DCMAKE_CUDA_COMPILER=/sw/cuda/12.4.1/bin/nvcc -DCMAKE_CUDA_ARCHITECTURES="75" -DRAJA_ENABLE_EXAMPLES=ON -DRAJA_ENABLE_TESTS=ON -DRAJA_ENABLE_BENCHMARKS=ON -DENABLE_BENCHMARKS=ON .
cmake --build build/ -j12
That seems to be working so far! The full build took about 30 minutes. I’m using the gcc/13.2.0 compiler module because that’s the one used for the latest CUDA-aware OpenMPI module on Klone. Gotta make sure all the versions match up if we don’t want to be chasing down the most annoying linking problems imaginable.
Building METIS#
When linking with the latest CUDA and OpenMP modules, I want a METIS built with the same gcc that was used for OpenMPI. That means building METIS from scratch.
Building METIS is pretty easy, but by default it does not statically link in the GKlib dependencies. To create a static libmetis.a library that WARPXM can use without also needing to link in a GKlib installation, we can manually combine GKlib into the libmetis.a:
module load gcc/13.2.0
git clone https://github.com/KarypisLab/METIS.git
git clone https://github.com/KarypisLab/GKlib.git
cd GKlib
make config prefix=/gscratch/aaplasma/embluhm/tools/GKlib
make install
cd ../METIS
make config gklib_path=/mmfs1/gscratch/aaplasma/embluhm/tools/GKlib prefix=/mmfs1/gscratch/aaplasma/embluhm/tools/METIS
make install

# Create a combined static libmesh.a, and copy it over top of the old libmetis.a
mkdir /tmp/metis_combined && cd /tmp/metis_combined
ar -x /mmfs1/gscratch/aaplasma/embluhm/tools/GKlib/lib64/libGKlib.a
ar -x /mmfs1/gscratch/aaplasma/embluhm/tools/METIS/lib/libmetis.a
ar -rcs /mmfs1/gscratch/aaplasma/embluhm/tools/METIS/lib/libmetis.a *.o
cd && rm -rf /tmp/metis_combined
Static build with -fPIC#
At some point for some reason, my build stopped working without building METIS with support for position-independent code (the -fPIC option for most compilers). This means building metis and gklib with the shared=1 option, and making some fixes to their build pipeline. For this, I’ve chosen to use the same prefix for both gklib and metis, since that solves a lot of dependency resolution problems and gets rid of the need for that archive mess above:
module load gcc/13.2.0
git clone https://github.com/KarypisLab/METIS.git
git clone https://github.com/KarypisLab/GKlib.git

cd GKlib
make config shared=1 prefix=/mmfs1/gscratch/aaplasma/embluhm/tools/METIS
cd build/Linux-x86_64 && make -j12 install
# For reasons I do not understand, METIS is looking for the new static libGKlib.so under lib/, but the
# GKlib build puts it under lib64/libGKlib.so.0.0.1, so we need to add a symbolic link to where METIS is looking
ln -s /gscratch/aaplasma/embluhm/tools/METIS/lib64/libGKlib.so /gscratch/aaplasma/embluhm/tools/METIS/lib/
ln -s /gscratch/aaplasma/embluhm/tools/METIS/lib64/libGKlib.so.0 /gscratch/aaplasma/embluhm/tools/METIS/lib/
ln -s /gscratch/aaplasma/embluhm/tools/METIS/lib64/libGKlib.so.0.0.1 /gscratch/aaplasma/embluhm/tools/METIS/lib/

cd ../../../METIS
make config shared=1 prefix=/mmfs1/gscratch/aaplasma/embluhm/tools/METIS
cd build && make -j12 install
Building HDF5-parallel#
With no HDF5 module to rely on, we can just build it ourselves. It’s not too bad, as long as we get lucky :)
salloc -A aaplasma -c 20 --mem=24G --time=2:00:00
module purge
module load ompi/4.1.6-2 gcc/13.2.0
wget https://github.com/HDFGroup/hdf5/releases/download/hdf5_1.14.6/hdf5-1.14.6.tar.gz
tar -zxvf hdf5-1.14.6.tar.gz
cd hdf5-1.14.6/
mkdir build
cd build
cmake -DCMAKE_BUILD_TYPE=Release  -DHDF5_ENABLE_PARALLEL=ON  -DBUILD_SHARED_LIBS=ON  -DBUILD_TESTING=ON  -DCMAKE_INSTALL_PREFIX=/gscratch/aaplasma/embluhm/tools/hdf5-mpi-1.14.6 -DCMAKE_C_COMPILER=/sw/ompi/4.1.6-2/bin/mpicc -DMPI_HOME=/sw/ompi/4.1.6-2 -DMPIEXEC_MAX_NUMPROCS=4 ..
make -j20 install
Building Kokkos#
- Grab the Kokkos source from a GitHub release (latest is probably good)
- Create a build script (e.g. build_kokkos.sh). I’ve chosen to only enable the CUDA backend and not the OpenMP backend, because I’m not using OpenMP thread parallelism and I don’t want to have to deal with setting OpenMP environment variables every time I run something just to avoid it spinning up OpenMP threads to do nothing. If you want OpenMP enabled, just turn on that option. I’ve picked CUDA arch 7.5 as the minimum version to use.
#!/bin/bash -ex module purge module load cuda/12.9.1 ompi/4.1.6-2 gcc/13.2.0 rm -rf build mkdir -p build cmake -B build/ \ -DCMAKE_INSTALL_PREFIX=/gscratch/aaplasma/embluhm/tools/kokkos-cuda12.9.1 \ -DCMAKE_BUILD_TYPE=Release \ -DKokkos_ENABLE_CUDA=ON -DCUDA_ROOT=/sw/cuda/12.9.1 -DKokkos_ARCH_TURING75=ON \ -DKokkos_ENABLE_OPENMP=OFF \ -DKokkos_ENABLE_SERIAL=ON cmake --build build/ -j20 cd build make install ln -s /gscratch/aaplasma/embluhm/tools/kokkos-cuda12.9.1/lib64 /gscratch/aaplasma/embluhm/tools/kokkos-cuda12.9.1/lib - Make it executable
chmod +x build_kokkos.sh - Submit a job to build Kokkos using the build script. This will take a little while. Afterwards, Kokkos will be installed at the location specified by CMAKE_INSTALL_PREFIX in the build script (can be wherever you want)
salloc -A aaplasma -c 20 --mem=24G --time=2:00:00 srun ./build_kokkos.sh
Building Kokkos-enabled WARPXM#
Now that I’ve added a whole bunch of Kokkos-related dependencies to WARPXM, I can’t just use the existing PETSc-based modules for all of the other dependencies. At present, the dependencies required to build all of the WARPXM features (other than the old PETSc-based implicit solver) are:
- MPI implementation (OpenMPI)
- CMake
- METIS
- HDF5 (linked against MPI)
- Kokkos (with CUDA)
There are modules for CUDA-aware OpenMPI, so we don’t have to worry about that. We just
module load cuda/12.9.1 ompi/4.1.6-2 gcc/13.2.0We do need HDF5 and METIS, so let’s go ahead and build them first, following the instructions above.
The script that I’m using to put all of this together and build WARPXM looks like this:
#!/bin/bash -ex
module purge
module load cuda/12.9.1 ompi/4.1.6-2 gcc/13.2.0
export HDF5_DIR=/gscratch/aaplasma/embluhm/tools/hdf5-mpi-1.14.6/cmake
export OMPI_CXX=/gscratch/aaplasma/embluhm/tools/kokkos-cuda12.9.1/bin/nvcc_wrapper
export PKG_CONFIG_PATH=/sw/ompi/4.1.6-2/lib/pkgconfig:$PKG_CONFIG_PATH
cd /gscratch/aaplasma/embluhm/code/warpxm || return 1

if [ ! -d build ]; then
    mkdir build || return 1
else
    rm -f build/CMakeCache.txt
fi

# RelWithDebInfo
cmake -B build/ \
    -DWXM_ENABLE_KOKKOS=ON \
    -DHDF5_ROOT=/gscratch/aaplasma/embluhm/tools/hdf5-mpi-1.14.6 \
    -DMetis_ROOT=/gscratch/aaplasma/embluhm/tools/METIS \
    -DKokkos_ROOT=/gscratch/aaplasma/embluhm/tools/kokkos-cuda12.9.1 \
    -DCMAKE_BUILD_TYPE=Debug \
    -DCMAKE_C_COMPILER=/sw/ompi/4.1.6-2/bin/mpicc \
    -DCMAKE_CXX_COMPILER=/sw/ompi/4.1.6-2/bin/mpicxx \
    -DWXM_ENABLE_TRACY= \
    -DCUDAToolkit_ROOT=/sw/cuda/12.9.1 \
    -DPython_EXECUTABLE=/gscratch/aaplasma/embluhm/conda/python3-11/bin/python3 \
    -DMPI_HOME=/sw/ompi/4.1.6-2 \
    . || return 1

cmake --build build/ -j20 || return 1

cd build || return 1
ctest -j20 --output-on-failure --label-regex "Unit" || return 1
I put all of this into a klone_build_script.sh in the warpxm project root, and then kick off a build with:
salloc -A aaplasma -c 20 --mem=24G --time=2:00:00 srun ./klone_build_script.shSpack#
spack is a software build system geared towards HPC applications with lots of complicated dependencies. The documentation for Spack gives a good overview.
There are a few quirks to using Spack on Hyak.
Set-up prereqs#
- Spack wants a Python version higher than 3.8, so the default
/usr/bin/python3doesn’t cut it. I’ve had good luck using miniconda for my python environment. The Hyak documentation has a good set of instructions for installing miniconda on Hyak in a way that actually works. Since I’m using miniconda, I set this environment variable:# ~/.bashrc export SPACK_PYTHON=/gscratch/aaplasma/embluhm/tools/miniconda3/bin/python3 - As usual, the slow GPFS filesystem makes the spack package cache nearly useless, and it can take ~30+ minutes just to refresh the latest package registries. To fix this, we can tell it to use the local scratch disk
/scrfor the local downloads# ~/.bashrc export SPACK_USER_CACHE_PATH=/scr/embluhm/.spack export spack_user_config_path=/scr/embluhm/.spack
Install Spack#
Spack is just a collection of Python and Bash scripts, so installing is as simple as cloning the repo. I tend to keep everything in my folder in the departmental gscratch space:
git clone https://github.com/spack/spack.git /gscratch/aaplasma/embluhm/tools/spackTo load the spack commands into our shell, we source their setup file
# ~/.bashrc
. /gscratch/aaplasma/embluhm/tools/spack/share/spack/setup-env.sh
Configure Spack#
Now, before we start actually using spack to do anything, I find it useful to configure it for the Hyak environment. Specifically, I want Spack to use the same gcc compiler module that I’m using to compile my code. I also want to tell it about the system mpi and cuda modules, and I want to install the resulting Spack-compiled packages into my own directory. There are three config files I use to do this:
mkdir -p ~/.spack# ~/.spack/config.yaml
config:
install_tree:
root: /mmfs1/gscratch/aaplasma/embluhm/spack-install
build_stage:
- /tmp/embluhm/spack-stage
source_cache: /mmfs1/gscratch/aaplasma/embluhm/spack-cache
misc_cache: /mmfs1/gscratch/aaplasma/embluhm/spack-misc-cache# ~/.spack/packages.yaml
packages:
all:
providers:
mpi: [openmpi]
gcc:
externals:
- spec: gcc@13.2.0
prefix: /sw/gcc/13.2.0
extra_attributes:
compilers:
c: /sw/gcc/13.2.0/bin/gcc
cxx: /sw/gcc/13.2.0/bin/g++
fortran: /sw/gcc/13.2.0/bin/gfortran
buildable: false
cuda:
externals:
- spec: cuda@12.9.86
prefix: /sw/cuda/12.9.1
buildable: false
mpi:
require: openmpi@4.1.6
openmpi:
externals:
- spec: openmpi@4.1.6
prefix: /sw/ompi/4.1.6-2
buildable: false# ~/.spack/modules.yaml
modules:
default:
roots:
lmod: /mmfs1/gscratch/aaplasma/embluhm/spack-modules/lmod
enable:
- lmod
lmod:
hpctoolkit:
autoload: none
all:
autoload: direct
core_compilers:
- gcc@13.2.0Using Spack#
With all of our configuration in place, we can use spack to install a package. First, let’s run spack compiler find to check that Spack knows about our compiler modules. The first spack command we run will cause it to fetch some package info, so it’ll take a little bit longer
salloc -A aaplasma -c 40 --mem=24G --time=2:00:00
(base) [embluhm@n3363 embluhm]$ spack compiler find
remote: Enumerating objects: 20139, done.
remote: Counting objects: 100% (20139/20139), done.
remote: Compressing objects: 100% (10881/10881), done.
remote: Total 20139 (delta 1313), reused 14041 (delta 1145), pack-reused 0 (from 0)
==> Added 1 new compiler to /mmfs1/home/embluhm/.spack/packages.yaml
    gcc@8.5.0
==> Compilers are defined in the following files:
    /mmfs1/home/embluhm/.spack/packages.yaml

(base) [embluhm@n3363 embluhm]$ spack compiler list
==> Available compilers
-- gcc rocky8-x86_64 --------------------------------------------
[e]  gcc@8.5.0  [e]  gcc@13.2.0
Run spack solve on a small package, which causes Spack to install the concretizer (the component that determines how best to build the latest version of a new package) and show how it would build the package for us
(base) [embluhm@n3363 embluhm]$ spack solve zlib
==> Installing "clingo-bootstrap@=spack~apps~docs+ipo+optimized+python+static_libstdcpp build_system=cmake build_type=Release commit=2a025667090d71b2c9dce60fe924feb6bde8f667 generator=make patches:=bebb819,ec99431 platform=linux os=centos7 target=x86_64" from a buildcache
==> Best of 1 considered solutions.

  Priority  Value  Criterion
         1      0  requirement weight
         2      0  deprecated versions used
         3      0  version badness (roots)
         4      0  variant penalty (roots)
         5      0  default values of variants not being used (roots)
         6      0  preferred compilers
         7      0  compiler penalty from reuse
         8      0  variant penalty (non-roots)
         9      0  preferred providers (excluded compilers and language runtimes)
        10      0  number of compilers used on the same node
        11      0  non-preferred OS's
        12      0  version badness (non roots)
        13      0  default values of variants not being used (non-roots)
        14      0  target mismatches
        15      0  non-preferred targets
        16      0  preferred providers (language runtimes)
        17      0  version badness (runtimes)
        18      0  non-preferred targets (runtimes)
        19      0  providers on edges
        20      0  version badness on edges
        21      0  penalty on symmetric duplicates
        22      1  number of packages to build (vs. reuse)
        23      0  number of nodes from the same package
        24      0  build unification sets
        25      0  deprecated versions used
        26      0  version badness (roots)
        27      0  variant penalty (roots)
        28      0  default values of variants not being used (roots)
        29      0  preferred compilers
        30      0  compiler penalty from reuse
        31      0  variant penalty (non-roots)
        32      0  preferred providers (excluded compilers and language runtimes)
        33      0  number of compilers used on the same node
        34      0  non-preferred OS's
        35      5  version badness (non roots)
        36      0  default values of variants not being used (non-roots)
        37      0  target mismatches
        38     14  non-preferred targets
        39      0  preferred providers (language runtimes)
        40     12  version badness (runtimes)
        41     14  non-preferred targets (runtimes)
        42      0  providers on edges
        43     10  version badness on edges
        44      0  penalty on symmetric duplicates


  Legend:
    Specs to be built
    Reused specs
    Other criteria

 -   zlib@1.3.2+optimize+pic+shared build_system=makefile platform=linux os=rocky8 target=cascadelake %c,cxx=gcc@13.2.0
[+]      ^compiler-wrapper@1.0 build_system=generic platform=linux os=rocky8 target=cascadelake
[e]      ^gcc@13.2.0+binutils+bootstrap~graphite+libsanitizer~mold~nvptx~piclibs~profiled~strip build_system=autotools build_type=RelWithDebInfo languages:='c,c++,fortran' platform=linux os=rocky8 target=x86_64
[+]      ^gcc-runtime@13.2.0 build_system=generic platform=linux os=rocky8 target=cascadelake
[e]      ^glibc@2.28 build_system=autotools platform=linux os=rocky8 target=x86_64
[+]      ^gmake@4.4.1~guile build_system=generic platform=linux os=rocky8 target=cascadelake %c=gcc@13.2.0
If we install it, then Spack should fetch and build all of the relevant build tools and dependencies, and install the package into the config.install_tree.root that we specified
(base) [embluhm@n3363 embluhm]$ spack install zlib
[+] dbyksgm zlib@1.3.2 /mmfs1/gscratch/aaplasma/embluhm/spack-install/linux-cascadelake/zlib-1.3.2-dbyksgmjtrsrjxyt5vevardk4ltnycxl (13s)
To use the package, we can use the spack load command to set the appropriate environment variables
(base) [embluhm@n3363 embluhm]$ spack load zlib
(base) [embluhm@n3363 embluhm]$ env | grep zlib
CMAKE_PREFIX_PATH=/mmfs1/gscratch/aaplasma/embluhm/spack-install/linux-cascadelake/zlib-1.3.2-dbyksgmjtrsrjxyt5vevardk4ltnycxl:/mmfs1/gscratch/aaplasma/embluhm/spack-install/linux-cascadelake/gcc-runtime-13.2.0-hopjej6gea46kacn3xvpmqn4cn6f7uln
MANPATH=/mmfs1/gscratch/aaplasma/embluhm/spack-install/linux-cascadelake/zlib-1.3.2-dbyksgmjtrsrjxyt5vevardk4ltnycxl/share/man:/usr/share/man:/opt/ohpc/admin/lmod/lmod/share/man:
PKG_CONFIG_PATH=/mmfs1/gscratch/aaplasma/embluhm/spack-install/linux-cascadelake/zlib-1.3.2-dbyksgmjtrsrjxyt5vevardk4ltnycxl/lib/pkgconfig:/usr/share/pkgconfig:/usr/lib64/pkgconfig:/mmfs1/home/embluhm/usr/lib/pkgconfig:/usr/local/lib/pkgconfig:/mmfs1/home/embluhm/usr/lib/pkgconfig:/usr/local/lib/pkgconfig:HPCToolkit#
You’ve got to use Spack to install hpctoolkit, so follow the Spack instructions first!
Once Spack is all set up, installing it should be a breeze (even though it may take quite a while)
salloc -A aaplasma -c 40 --mem=24G --time=2:00:00 srun spack install -j20 hpctoolkit +cuda +mpi
[+] ky4iupi hpctoolkit@2025.1.2 /mmfs1/gscratch/aaplasma/embluhm/spack-install/linux-cascadelake/hpctoolkit-2025.1.2-ky4iupieagu5ojporiq76f4nwtqu7n4l (2m59s)
Once installed, we can use hpcrun to profile a WARPXM run
# Interactive session, with modules loaded as appropriate for WARPXM
spack load hpctoolkit
hpcrun -o hpctoolkit-warpxm-t \
  -e CPUTIME -e gpu=cuda,pc -t \
  /gscratch/aaplasma/embluhm/code/warpxm/build/bin/warpxm \
    -i khi_A1-16x16x16x16-kokkos-short.inp
Here the -e gpu=cuda,pc flag tells it to monitor GPU events. The -t flag tells it to gather timeline information. Make sure that WARPXM is compiled with -DCMAKE_BUILD_TYPE=RelWithDebInfo to include source line information in the executable. The sim should run as normal. We then use a couple of other tools to analyze the profiling data and create a database that we can analyze locally with hpcviewer.
# Analyze CPU/GPU program structure
hpcstruct -j10 --gpucfg yes hpctoolkit-warpxm-t
# Interpret hpcrun profile and correlate with source information
hpcprof -o hpctoolkit-warpxm-db hpctoolkit-warpxm-t
These can take a few minutes to churn through everything. When they’re done we can scp the resulting database hpctoolkit-warpxm-db to our local machine and view the results. Follow the installation docs to find the pre-built hpcviewer binaries for your machine: https://gitlab.com/hpctoolkit/hpcviewer/-/blob/main/INSTALL.md. Then open up hpcviewer and ‘Open local database’ -> hpctoolkit-warpxm-db. You should see a Profile tab and a Trace tab.
The Profile tab lets you drill down in the call stack to the source code locations where the program spends the majority of its time:

The Trace tab gives us a timeline of the program, where each color represents a different function in the stack. Each row in the main panel corresponds with a thread, either on the CPU or the GPU. Here, we’ve got a single-rank run using one GPU device with two streams. We can use ‘Filter’ -> ‘Filter execution contexts’ to narrow it down to CPU thread 0, GPU thread 0, and GPU thread 1 since those are the only interesting threads for WARPXM. If we click anywhere in the main view, it takes us to the call stack at that time so we can see what’s currently happening at that time
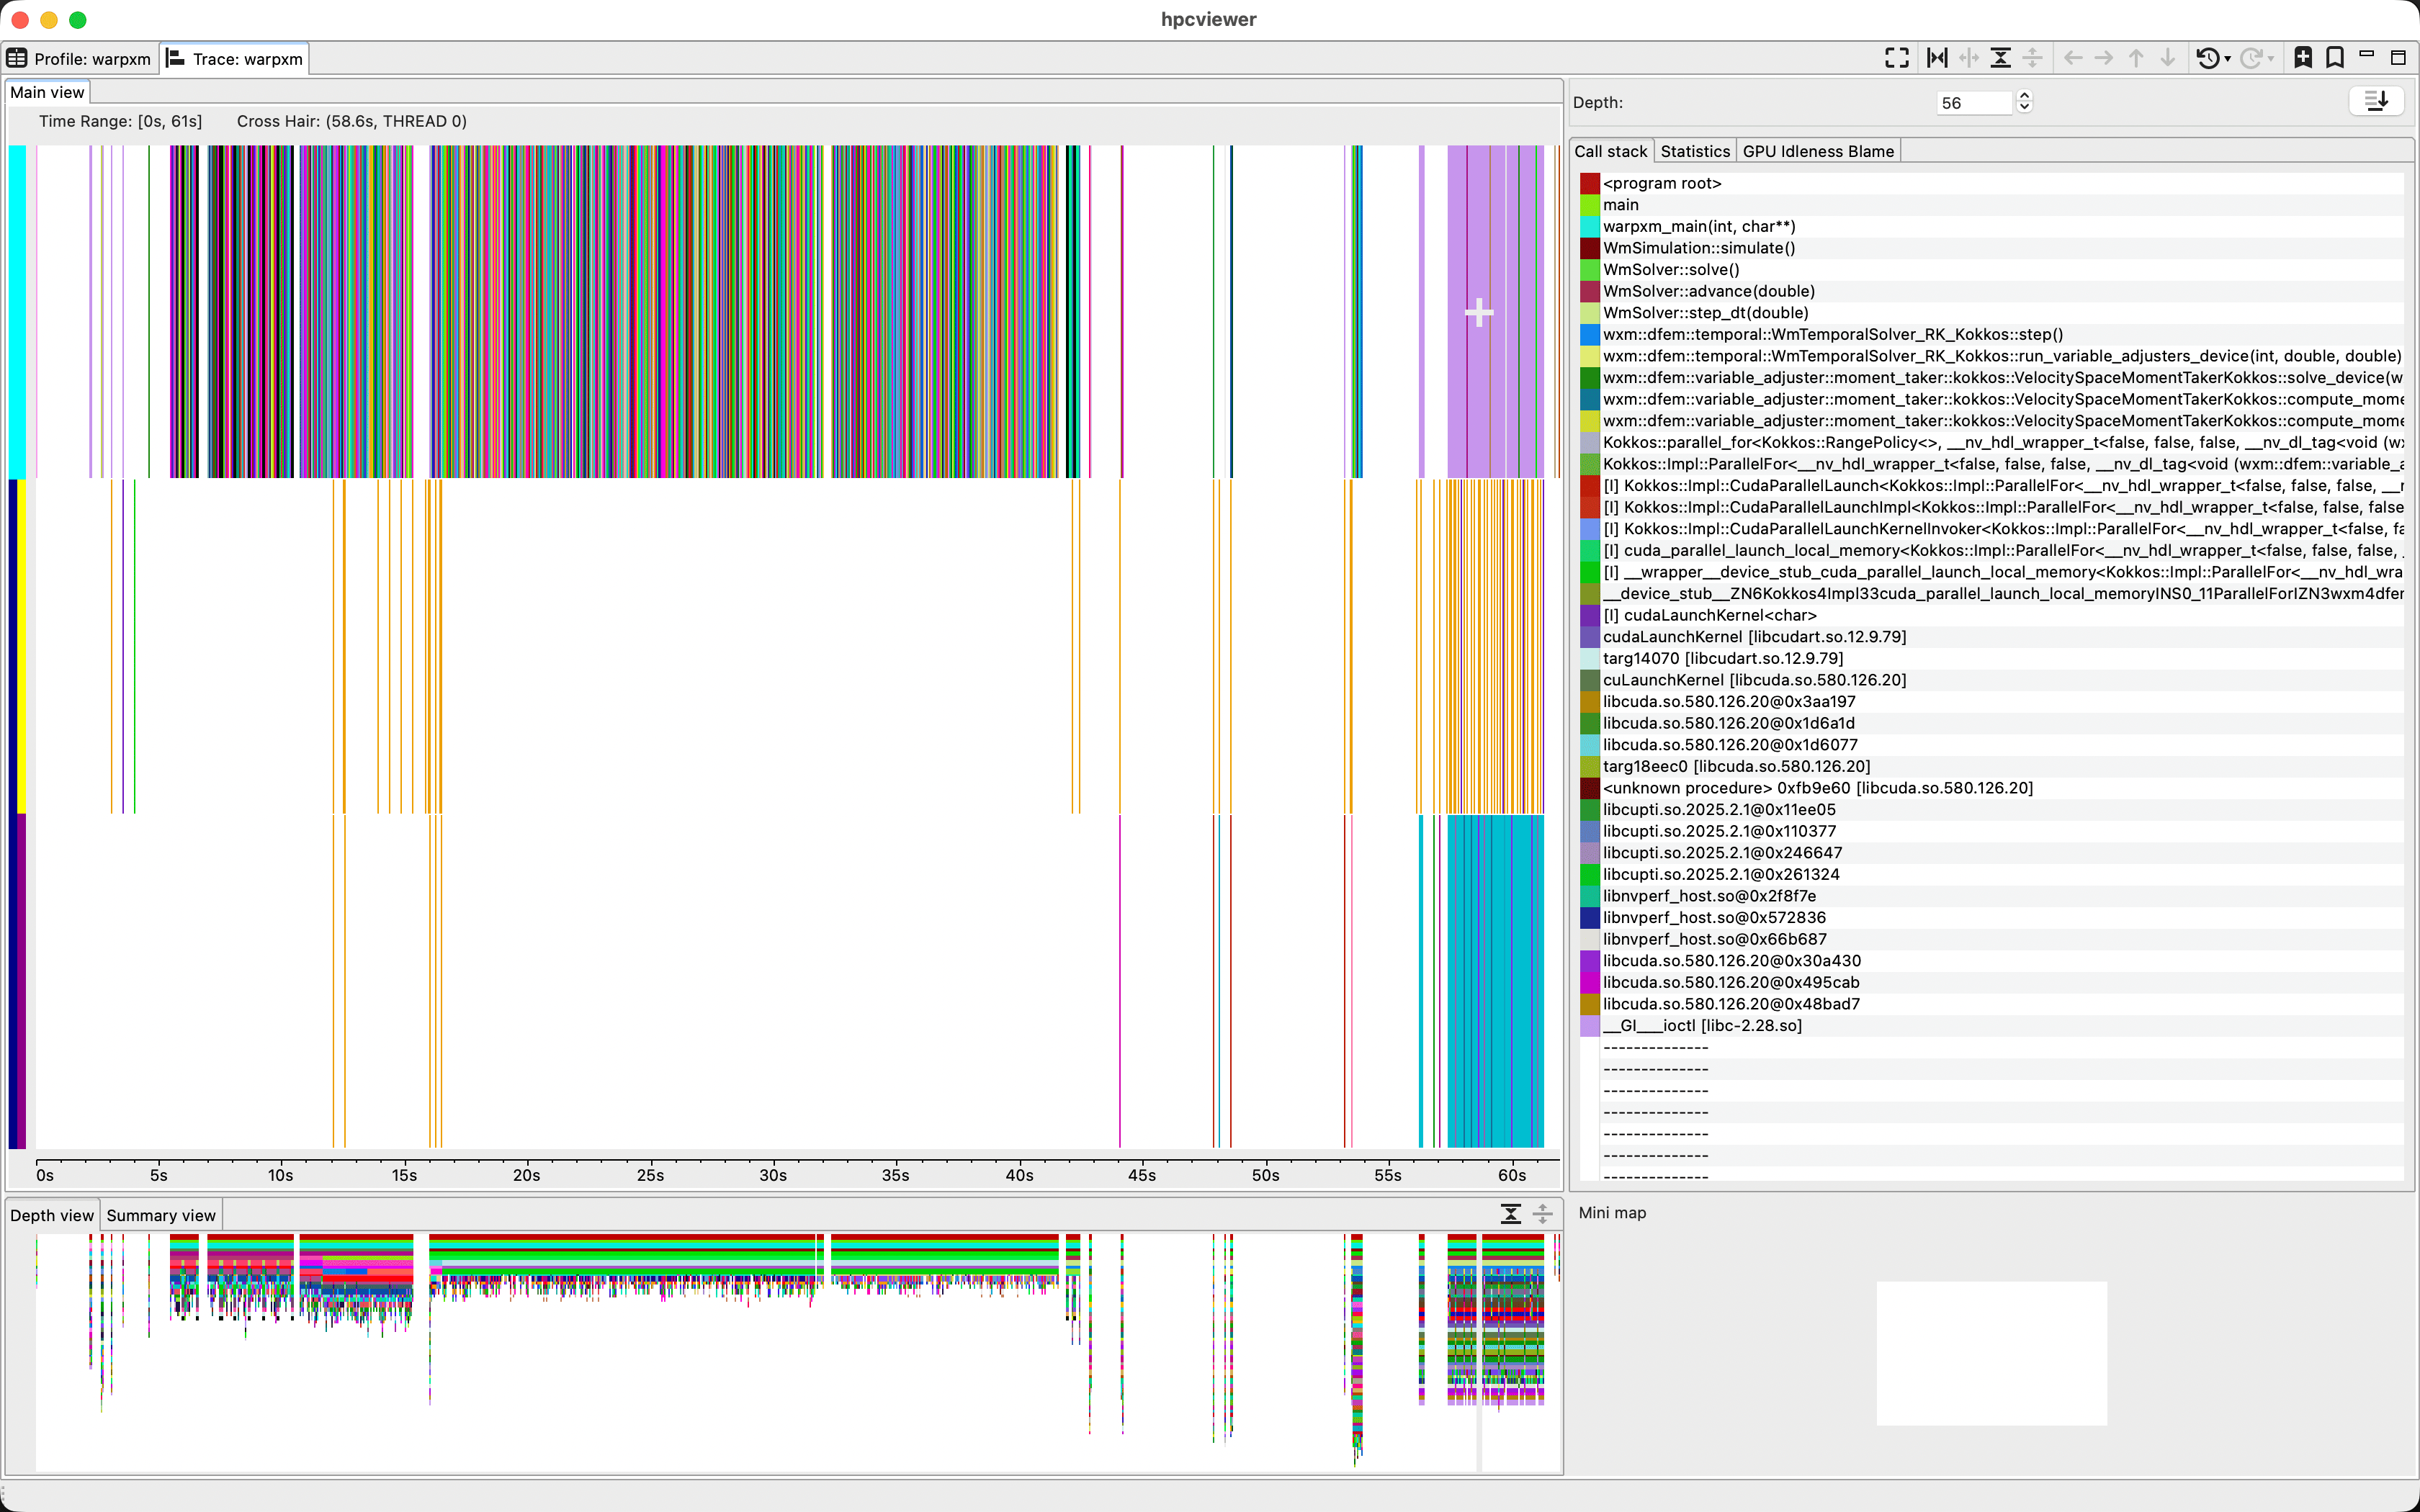
Here, the top row is the CPU thread, the middle row is the default CUDA stream, and the bottom row is a second CUDA stream. We can select and drag a region of the timeline to zoom in. Clicking on a line in the call stack pane causes the timeline to display the colors of each function at that specific call stack depth, which is useful for visualizing what’s going on at a specific level of the program. For example, we can select a depth right below the WmTemporalSolver::step() function to visualize the lifecycle of each time step
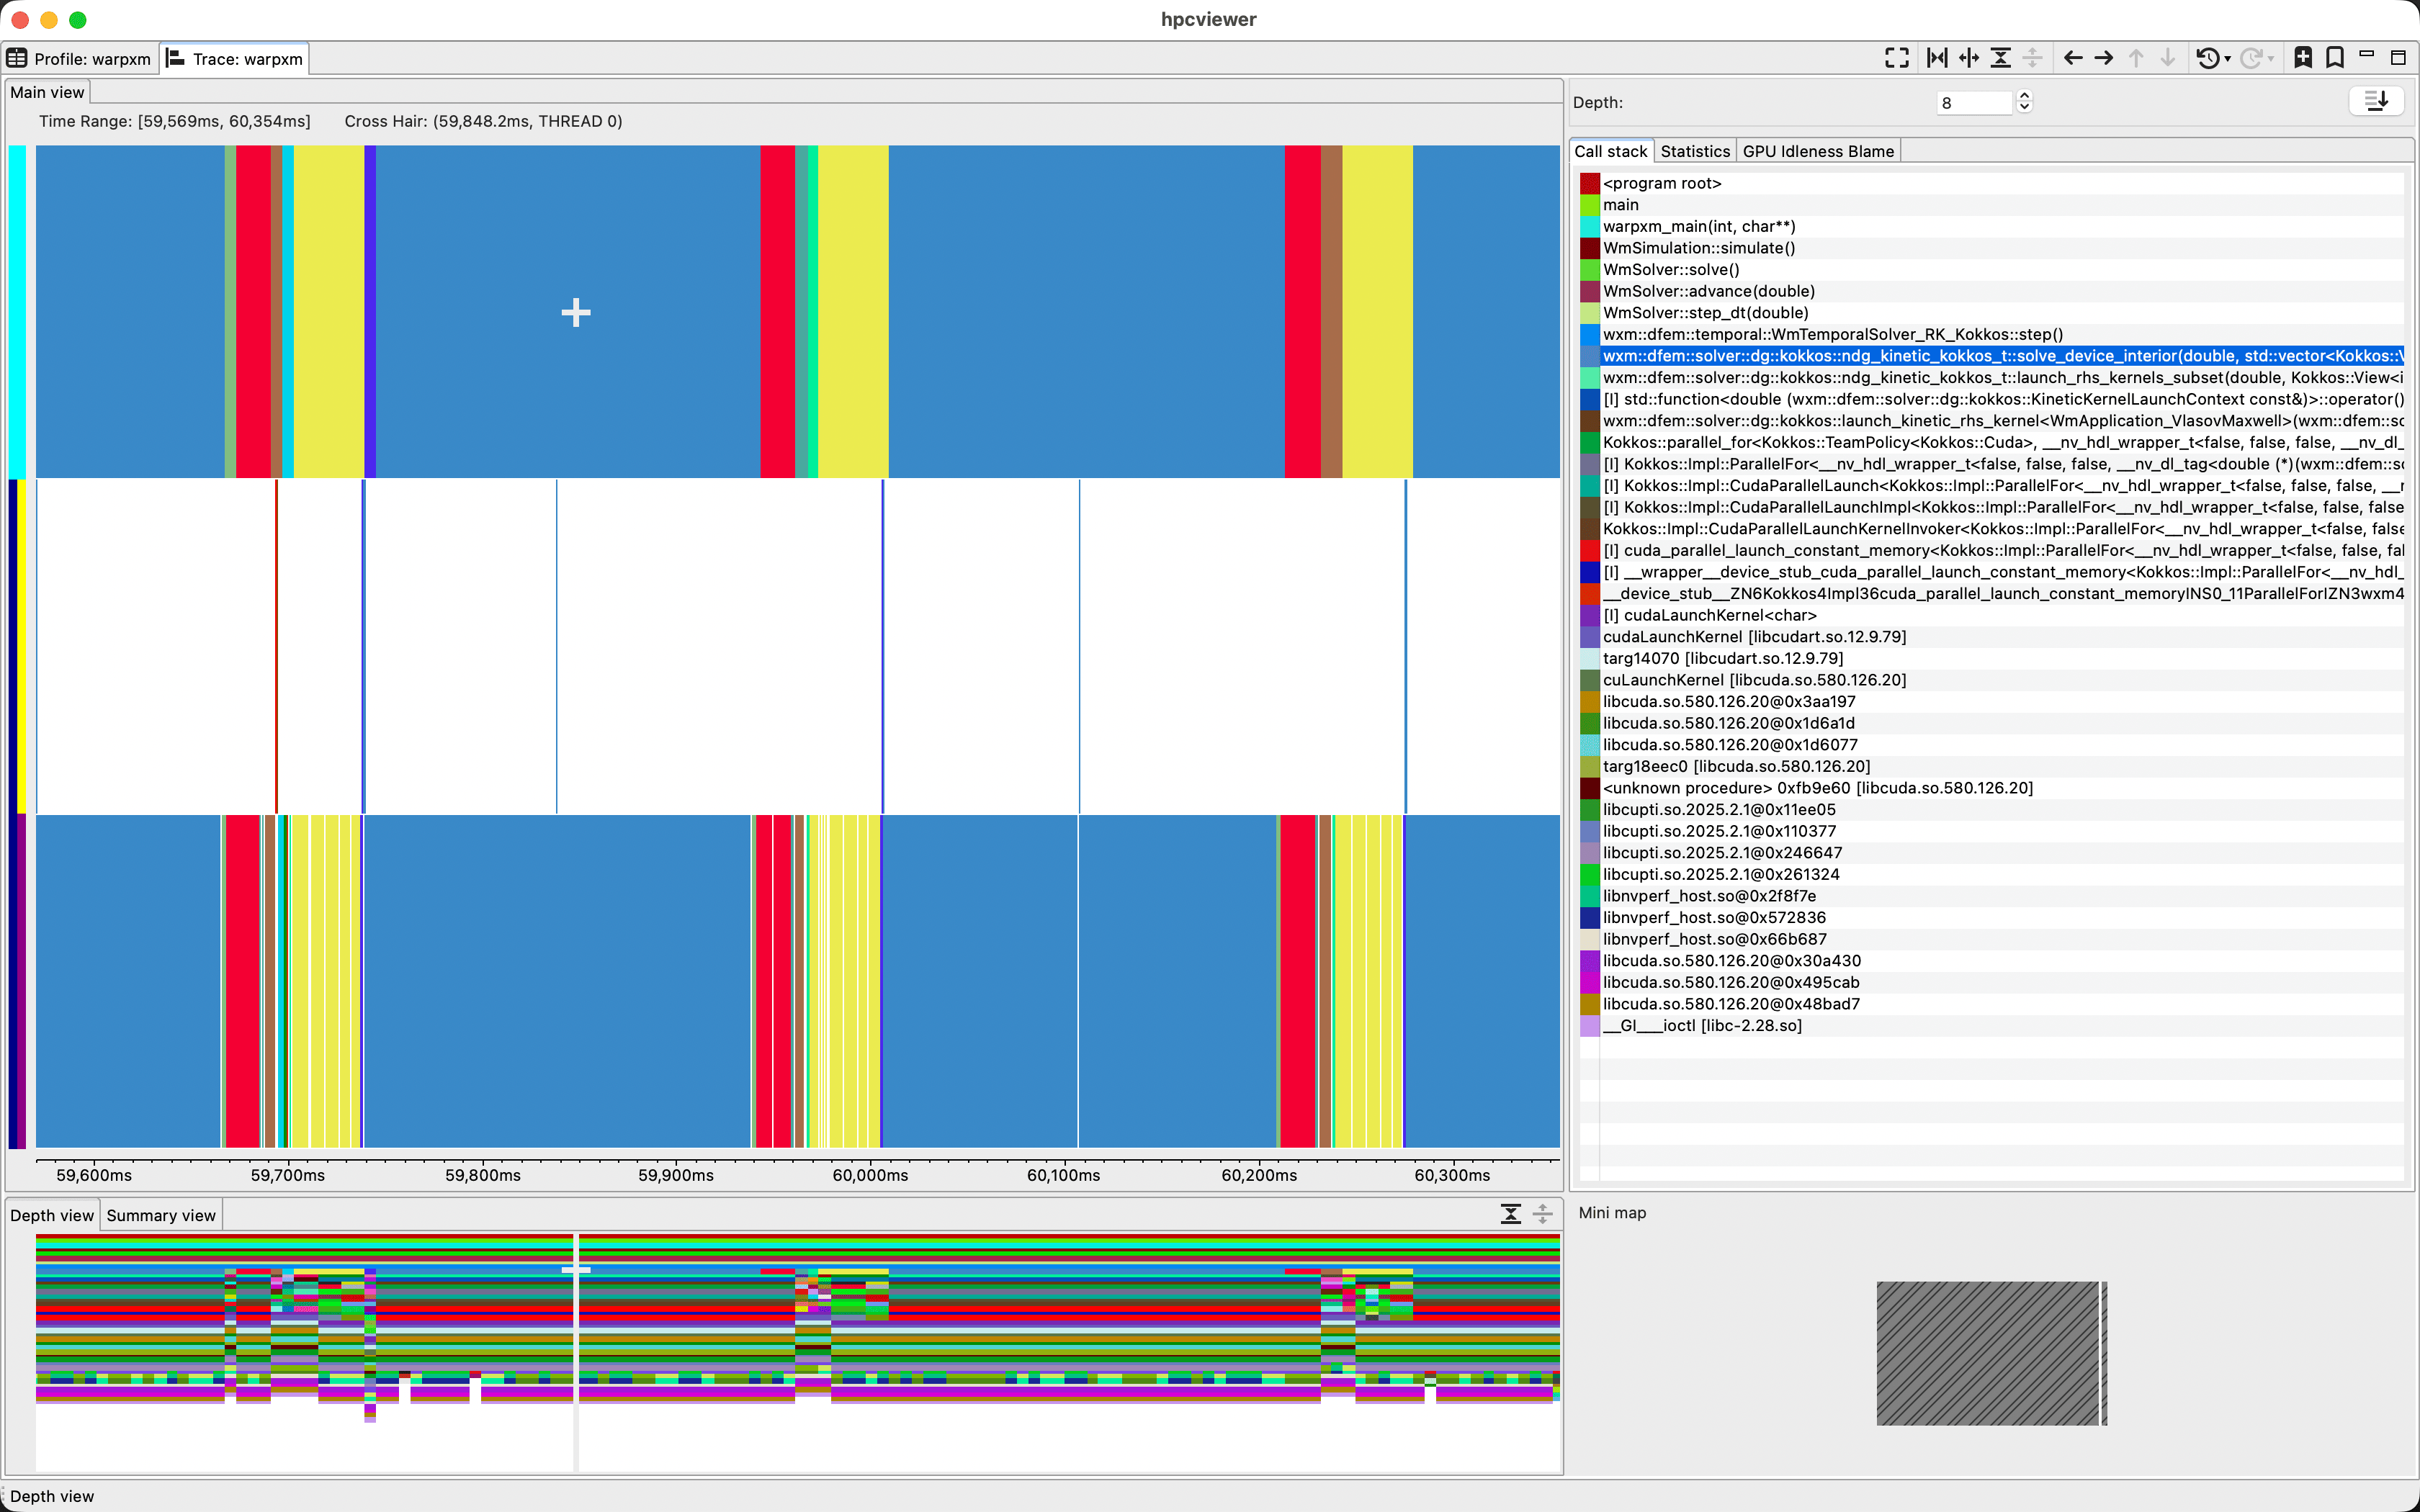
It’s not the most intuitive visualization tool I’ve ever seen, and it doesn’t give us detailed information about kernel performance or cache usage, but for really parallel programs with tons of MPI ranks it can be a really useful tool for identifying bottlenecks and load imbalances.
hpcrun is a sampling profiler, which means it takes measurements at periodic intervals. If the interval is too long, you’ll miss some events. You can set the frequency of event monitoring via hpcrun command-line arguments. For example, to monitor CPU timeline data at a frequency of 200 samples/second, we would say
hpcrun -o hpctoolkit-warpxm-t \
  -e CPUTIME@f200 -e gpu=cuda,pc -t \
  /gscratch/aaplasma/embluhm/code/warpxm/build/bin/warpxm \
    -i khi_A1-16x16x16x16-kokkos-short.inp
There are a variety of other metrics we can gather, as described in the hpctoolkit documentation.