What is WARPXM#
WARPXM is an extensible framework for solving hyperbolic PDE systems. By “framework” we mean that it is not a single tool for solving a particular type of system, but rather it contains a number of applications, solvers, and other tools which can be combined to create a wide variety of models. By “extensible,” we mean the framework allows for defining additional components which can be mixed in with the existing solvers and applications.
Installation#
Source#
To use WARPXM for running simulations, you must first gain access the WARPXM source code. The code is currently hosted on GitHub: https://github.com/UW-Computational-Plasma-Group/warpxm. Obtaining access generally involves being added as a collaborator to the repository by one of the existing owners.
Once you have access, clone the repository to wherever you would like to work on your local machine:
cd /path/to/your/workspace
git clone https://github.com/UW-Computational-Plasma-Group/warpxm
Prerequisites: WARPXM#
Building the warpxm executable itself is the most important part. It is a C++ project which uses CMake as the build system. The main dependencies required to build warpxm are:
- CMake: A general-purpose tool for building complex C++ projects.
- PETSc: A sort of toolkit / package manager for scientific computing packages. It is the underlying framework which
warpxmis built on top of. It can also be used to install compatible versions of most of the other dependencies, like OpenMPI, METIS, HDF5, BLAS/LAPACK, and CMake. - OpenMPI: Message-passing interface used to parallelize simulations across independent compute cores.
- HDF5: Library used to read & write HDF5-formatted simulation data to disk.
- METIS: Graph and mesh partitioning library.
In my experience, the simplest way to install the required dependencies (especially on the newer M1/M2 Apple architecture) is to simply use the pre-packaged Homebrew formulas to install the required dependencies at the system level:
brew install petsc hdf5-mpi cmake gcc metis openblas scalapack pkg-configThat’s it, all of the C++/CMake dependencies are now installed at the system level! No need to modify any PATH/LD_LIBRARY_PATH/PKG_CONFIG_PATH environment variables.
Debugging steps
- If installing C++ compilers for the first time on a new Mac, you probably need to run
xcode-select --installto accept the Xcode license and enable installing compilers provided by Apple. One of the above homebrew formulae will probably prompt you do to so when it is installed. brew install petscmay implicitly install thehdf5formlua, which is not compatible with WARPXM. If you get an error message along the lines of “HDF5 was not compiled with MPI”, try removing the non-mpi version and re-installing the mpi version of hdf5:brew uninstall --ignore-dependencies hdf5 hdf5-mpi brew install hdf5-mpi- If you have already tried to build WARPXM and needed to re-install some
brewformula, you should get rid of any CMake caches that were created when you last tried to build. The easiest way to do this is to delete the whole build folder, then runcmake /path/to/warpxmagain. This will force CMake to attempt to locate the dependencies in their new location, rather than trying to re-use an installation that you have already removed.
Ubuntu Linux
There are two general types of installation you can try:
- Install PETSc and some external packages in a user-specific location. This prevents conflicts with any other installations of e.g. metis or openmpi that you already have installed, but requires you to update your
PATH/LD_LIBRARY_PATH/PKG_CONFIG_PATHenvironment variables accordingly to make use of the local installation. - Install all of the WARPXM dependencies as system-level packages (including PETSc). This means that the versions installed for WARPXM will be used everywhere on the system. You do not have to update your
PATH/LD_LIBRARY_PATH/PKG_CONFIG_PATHenvironment variables.
System-wide Installation#
Install steps
If you run into issues with user-specific PETSc configuration, or are running into conflicts between system-level METIS/libblas/open-mpi packages and the PETSc dependencies, then it may help to use PETSc itself to install all of the dependencies at the system level. This avoids the need to set any PATH/LD_LIBRARY_PATH/PKG_CONFIG_PATH environment variables, as all of the required libraries will be installed in the default locations.
Note: This can take a long time to finish! You are essentially building openmpi, hdf5, hypre, superlu, metis, parmetis, fblaslapack, and cmake all from source with compiler optimizations enabled, so there is some real work to be done, but the end result should be a stable, performant installation.
- Install compilers, openmpi, and other basic tools from apt repositories:
sudo apt-get update
sudo apt-get install -y --no-install-recommends \
  build-essential \
  ca-certificates \
  cmake \
  curl \
  g++ \
  gfortran \
  git \
  libopenmpi-dev \
  openmpi-bin \
  pkg-config \
  python3-pip \
  sudo \
wget- Install PETSc and dependencies from source. The
--prefix=/usr/localflag means that all headers and libraries will be installed to/usr/local, which is in the default search path for all users on nearly all Debian-based linux distributions.
export PETSC_DIR="$HOME"/tools/petsc
mkdir -p "$HOME"/tools
git clone https://gitlab.com/petsc/petsc.git --depth=1 --branch=release "$PETSC_DIR"
cd "$PETSC_DIR"
git checkout release
sudo ./configure \
  --COPTFLAGS="-O3" \
  --CXXOPTFLAGS="-O3" \
  --FOPTFLAGS="-O3" \
  --download-hypre \
  --download-superlu_dist \
  --download-metis \
  --download-parmetis \
  --download-hdf5 \
  --download-fblaslapack \
  --download-cmake \
  --with-debugging=0 \
  --prefix=/usr/local
sudo chown -R "$USER":"$USER" "$PETSC_DIR"
make PETSC_DIR="$PETSC_DIR" PETSC_ARCH=arch-linux-c-opt all check
sudo make PETSC_DIR="$PETSC_DIR" PETSC_ARCH=arch-linux-c-opt install
User Installation#
Install steps
You can follow the Pre-install setup for Ubuntu Linux desktop instructions for on the wiki to install openmpi, cmake, and libblas from the apt package repositories, then get PETSc to download and install the rest to your own home directory, using the --prefix=$HOME/usr flag when configuring PETSc.
Prerequisites: Warpy#
The warpy Python module under tools/warpy contains helpful classes and functions that can be used to build and run input files for warpxm. You need to install a few additional Python modules to make full use of the plotting and diagnostic modules in warpy:
pip install numpy matplotlib h5pyWe also need to make sure that Python knows where to find the warpy module by adding it to our PYTHONPATH environment variable:
If you are using
bashfor your shell, open$HOME/.bash_profileand add the following at the end:export PYTHONPATH="/path/to/your/workspace/warpxm/build/tools/":$PYTHONPATHIf you are using
zshfor your shell, open$HOME/.zshrcand add the following at the end:export PYTHONPATH="/path/to/your/workspace/warpxm/build/tools/":$PYTHONPATHIf you are using
fishfor your shell, open$HOME/.config/fish.configand add the following at the end:set -gx PYTHONPATH "/path/to/your/workspace/warpxm/build/tools/":$PYTHONPATH
Build - VSCode#
I like to use VS Code as my development environment, since it is cross-platform, has a very large feature set, and adequate performance. The C++ and CMake extensions can help make building and debugging warpxm much easier.
- Install the ms-vscode.cpptools extension
- Install the ms-vscode.cmake-tools extension
- Create a new workspace at the root of the
warpxmrepository. The CMake extension will create awarpxm/builddirectory for “in-source” builds, which should work fine as long as you don’t need to test many different build configurations simultaneously. - Using the command pallette, run the “Cmake: Select Variant` command to select either “Release” (for optimized execution) or “Debug” (for additional assertions and debug symbols)
- Run the “Cmake: Configure” command to tell CMake to locate all of the required dependencies and generate linux Makefiles in the build directory.
- Run the “Cmake: Build” command to compile the whole project into the build directory. This can take several minutes the first time around, but compiled objects will be cached in between builds so small changes will re-compile quickly.
Congratulations, you’ve built it! To check that the compiled executable actually works, navigate to the warpxm/build directory and run make test.
Build - Command-line#
The install instructions on the wiki are great for building at the command-line. Broadly speaking, you will run cmake to locate dependencies and generate linux Makefiles for the project in a build directory, then run make to actually compile the project in the build directory.
Basic Example#
What do we need to define a valid discontinuous Galerkin simulation? Check the dg_sim warpy class definition!
| Parameter | Optional? | Description |
|---|---|---|
name | ⛔ | Descriptor for the particular simulation, used as a filename prefix for storing data. |
meshes | ⛔ | List of one or more mesh objects which define the spatial extent of the simulation. |
initial_conditions | ⛔ | List of one or more variable adjusters which are applied before the first time step. |
temporal_solvers | ⛔ | List of one or more time integrator host actions which move the state forward in time. |
dt_controller | ⛔ | Determines the length of each time step. Can be a simple constant dt, or can make use of adaptive time steppers to progress more quickly when possible. |
time | ⛔ | The start and end of the time interval to integrate. |
writers | ✅ | One or more “writer” host actions which are called upon to export snapshot data to disk. These can be simple writers that just export the current value of some variables, or they can be diagnostic writers which e.g. integrate variables across the domain before writing. Very useful for evaluating numerical stability and evaluating instability growth rates. |
write_steps | ✅ | Number of times during the simulation the provided writers should write data out to disk. |
cfl_max | ✅ | Maximum allowable Courant–Friedrichs–Lewy number. Defaults to 1 |
flexible_writeout | ✅ | |
verbosity | ✅ | Defaults to “info” |
global_verbosity | ✅ | Defaults to “info” |
num_partitions | ✅ | Defaults to 1 |
enable_fpe | ✅ | Defaults to True |
extra_start_host_actions | ✅ | |
pre_ti_host_actions | ✅ | |
post_ti_host_actions | ✅ | |
extra_end_host_actions | ✅ |
The most basic example provided in the repo solves the 1-dimensional linear advection system:
\[\pdv{q}{t} + \div (\vec c q) = 0\]This system has been implemented as a WARPXM application within src/apps/simple/advection.cc and registered with the type ID “advection”:
#include "lib/wxcreator.h"
REGISTER_CREATOR("advection", wxm::apps::advection_t, WmApplication);
The advection warpy application class in tools/warpy/apps/simple.py lets us set up a warpy simulation to model the advection system. First, we need to define the fluid variable q, which in our case will be the density \( \rho \). We’ll use basis elements with third-order spatial convergence for the spatial mesh:
import warpy

# Use second-order polynomial basis elements
sorder = 'thirdOrder'
# Create a variable for the fluid
fluid = warpy.variable(name='fluid', components=['rho'], basis_array_set=sorder)
# Set up the advection application operating on the fluid variable
apps = [warpy.apps.advection(name='advection', variable=fluid, velocity=velocity)]
We then need boundary conditions and an initial condition. Let’s set a step-function initial condition. The initial condition is a variable adjuster host action which is applied just before the first time step:
fluid_ic = warpy.apps.functions.arbitrary.heaviside(name='fluid_ic',
                                                    variable=fluid,
                                                    left=0.1,
                                                    right=0.6)
ic_va = warpy.variable_adjusters.function_evaluation.function_evaluator(
    name='ic_va',
    priority=0,
    spatial_order=sorder,
    on_subdomains=['all'],
    applications=[fluid_ic])
ic_ha = warpy.host_actions.va_runner(name='ic_ha', variable_adjusters=[ic_va])
To set up our temporal solver, we first specify that we want to use the discontinuous Galerkin spatial solver operating on our advection application:
spatial_solver = warpy.spatial_solvers.dg(name="dg",
                                          spatial_order=sorder,
                                          applications=apps,
                                          on_subdomains=['all'])
The temporal solver will be the third-order explicit Runge Kutta time stepper, and we will use a fixed time step:
temporal_solver = warpy.host_actions.erk(name='rk',
                                         scheme='SSPRK3',
                                         spatial_solvers=[spatial_solver],
                                         variable_adjusters=[])
dt = 1e-4
dt_final = 2.0
dt_controller = warpy.dt_calc.fixed_dt(dt)
Periodic boundary conditions are the default, so we do not need to explicitly specify any boundary conditions. If we wanted different boundary conditions, such as Dirichlet conditions on \( \rho \), we could specify them as additional variable adjusters like this:
dirichlet_bc_app = warpy.apps.simple.bc_dirichlet(name='bc_dirichlet_rho',
                                                  values=[1.0],
                                                  on_boundaries=['Left', 'Right'],
                                                  variable=fluid,
                                                  components=['rho'])
dirichlet_bc_va = warpy.variable_adjusters.boundary_conditions(name='bcs',
                                                               priority=1,
                                                               spatial_order=sorder,
                                                               applications=bc_apps)
temporal_solver = warpy.host_actions.erk(name='rk',
                                         scheme='SSPRK3',
                                         spatial_solvers=[spatial_solver],
                                         variable_adjusters=[dirichlet_bc_va])
We need to specify our spatial domain as a mesh:
# Generate a 1-D mesh with 128 mesh points
mesh = warpy.mesh.block(Bounds=[-0.5, 0.5],
                        NumCells=[128],
                        NodeSets=['Left', 'Right'],
                        NumLayers=1,
                        PeriodicBoundaries=['Left', 'Right'],
                        basis_array_set=sorder)
And finally, we will want to define variable writers to periodically write variables to disk. We’ll define a basic writer which just dumps the current fluid variables, as well as an integrator to check for mass conservation:
# Basic variable writer
writer = warpy.host_actions.writer(name='writer', ReadVars=[fluid])
# Diagnostic mass conservation integrator
integrator = warpy.host_actions.integrator(name='mass_integrator',
                                           time_integrator=temporal_solver,
                                           patch_process_integrators=[
                                               warpy.integrators.dg_integrator(
                                                   name='integrator',
                                                   spatial_order=sorder,
                                                   applications=[
                                                       warpy.apps.integrate.int_q_dv(
                                                           name='int_q_dv',
                                                           variables=fluid,
                                                           stage=0,
                                                           variables_components=['rho'])
                                                   ])
                                           ])
diag_writer = warpy.host_actions.diagnostics_writer(
    name='diagnostics',
    write_interval=1e-3,
    diagnostics={integrator: ['integral_rho']},
    output_file='diagnostics.csv')
writers = [writer, diag_writer]
Now we finally have everything we need to set up our simulation!
write_steps = 100
group_name = 'examples'
sim_name = 'advection'
sim = warpy.dg_sim(name=sim_name,
                   meshes=[mesh],
                   initial_conditions=[ic_ha],
                   temporal_solvers=[temporal_solver],
                   writers=writers,
                   time=[0, dt_final],
                   dt_controller=dt_controller,
                   flexible_writeout=False,
                   write_steps=write_steps,
                   verbosity='info')
We can write the resulting WARPXM input file to disk by calling sim.write:
sim.write(f="/path/to/input/file.inp)The resulting WARPXM input file (which we are very glad we did not have to craft by hand!) looks like this:
<warpxm>
  Simulation = sim
  NumericPrecision = double
  RunName = data/advection
  GlobalVerbosity = info
  Verbosity = info
  <sim>
    Type = WmSolverBase
    Kind = WmSolver
    Time = [0, 2.0]
    Out = 100
    EnableFPE = 1
    FlexibleWriteout = 0
    NumPartitions = 1
    <mesh>
      Type = mesh
      Kind = block
      NumLayers = 1
      OutputMeshPrefix = meshes/restartMesh
      Bounds = [-0.5, 0.5]
      NumCells = [128]
      NodeSets = [Left, Right]
      PeriodicBoundaries = [Left, Right]
      NodalMeshPrefix = meshes/plotMesh
      BasisArraySet = thirdOrder
    </mesh>
    <dt_controller>
      Type = WmHostAction
      Kind = time_stepper.fixed_dt
      InitDt = 0.0001
      CheckCFL = 1
    </dt_controller>
    <fluid>
      Type = variable
      Kind = distributed
      ComponentNames = [rho]
      BasisArraySet = thirdOrder
    </fluid>
    <fluid_1>
      Type = variable
      Kind = distributed
      ComponentNames = [rho]
      BasisArraySet = thirdOrder
    </fluid_1>
    <fluid_2>
      Type = variable
      Kind = distributed
      ComponentNames = [rho]
      BasisArraySet = thirdOrder
    </fluid_2>
    <fluid_3>
      Type = variable
      Kind = distributed
      ComponentNames = [rho]
      BasisArraySet = thirdOrder
    </fluid_3>
    <diagnostics>
      Type = WmHostAction
      Kind = diagnostics_writer
      WriteInterval = 0.001
      OutputFile = diagnostics.csv
      mass_integrator_SampleNames = [integral_rho]
      <mass_integrator>
        Type = WmHostAction
        Kind = integrator
        QOld = [fluid.rho]
        QStorage0 = [fluid_1.rho]
        QStorage1 = [fluid_2.rho]
        QStorage2 = [fluid_3.rho]
        <integrator>
          Process = dg_integrator
          Type = WmHostAction
          Kind = patchProcessor
          BasisArraySet = thirdOrder
          <int_q_dv>
            Type = application
            Kind = int_q_dv
            Stage = 0
            Vars = [0]
          </int_q_dv>
        </integrator>
      </mass_integrator>
    </diagnostics>
    <writer>
      Type = WmHostAction
      Kind = writeOut
      ReadVars = [fluid]
      WriteInterval = 1
    </writer>
    <ic_ha>
      Type = WmHostAction
      Kind = va_runner
      Vars = [fluid.rho]
      <ic_va>
        Process = function_evaluator
        Type = WmHostAction
        Kind = patchProcessor
        BasisArraySet = thirdOrder
        Priority = 0
        OnSubdomains = [all]
        <fluid_ic>
          Type = application
          Kind = heaviside_app
          LeftValue = 0.1
          RightValue = 0.6
          OutputVariables = [0]
        </fluid_ic>
      </ic_va>
    </ic_ha>
    <rk>
      Type = WmHostAction
      Kind = explicit_runge_kutta
      Scheme = SSPRK3
      QOld = [fluid.rho]
      QStorage0 = [fluid_1.rho]
      QStorage1 = [fluid_2.rho]
      QStorage2 = [fluid_3.rho]
      <dg>
        Process = spatial_solver.dg
        Type = WmHostAction
        Kind = patchProcessor
        BasisArraySet = thirdOrder
        SourceQuadratureStyle = LGL
        OnSubdomains = [all]
        <advection>
          Type = application
          Kind = advection
          Velocity = [1.0, 0.0, 0.0]
          Density = [0]
        </advection>
      </dg>
    </rk>
    <vloader>
      Type = WmHostAction
      Kind = variableLoader
      SourceFilePrefix = data/advection
      WriteVars = [fluid]
    </vloader>
    <gsync>
      Type = WmHostAction
      Kind = synchronizer
      WriteVars = [fluid]
    </gsync>
    <swapper>
      Type = WmHostAction
      Kind = variableSwapper
      WriteVars = [fluid, fluid_3]
    </swapper>
    <perstep_group>
      Type = WmSequencedGroup
      Kind = hostSequencedGroup
      HostActions = [rk]
    </perstep_group>
    <start_only_group>
      Type = WmSequencedGroup
      Kind = hostSequencedGroup
      HostActions = [ic_ha, gsync]
    </start_only_group>
    <write_group>
      Type = WmSequencedGroup
      Kind = hostSequencedGroup
      HostActions = [writer, diagnostics]
    </write_group>
    <vload_group>
      Type = WmSequencedGroup
      Kind = hostSequencedGroup
      HostActions = [vloader, gsync]
    </vload_group>
    <swap_group>
      Type = WmSequencedGroup
      Kind = hostSequencedGroup
      HostActions = [swapper]
    </swap_group>
    <SolverSequence>
      Type = WmSolverSequence
      StartOnly = [start_only_group]
      PerStep = [write_group, perstep_group, swap_group]
      PreRedoPerStep = [swap_group]
      EndOnly = [write_group]
      Restart = [vload_group]
    </SolverSequence>
  </sim>
</warpxm>
We can use sim.run() to immediately run warpxm with the generated input:
sim.run(category=group_name)$ python examples/advection_1d.py
Execution command is: /warpxm/build/bin/warpxm -i /warpxm/build/user_runs/evan_bluhm/examples/advection/advection.inp
Process id:38684 is 1 of 1 processes
Simulation started at time Thu Jun 1 10:19:04 2023
Advancing solution starting at time 0 to 0.02...
Advanced from frame 0 to 1 in 0.137 seconds,
with dt = 0.0001
Advancing solution starting at time 0.02 to 0.04...
Advanced from frame 1 to 2 in 0.105 seconds,
with dt = 0.0001
Advancing solution starting at time 0.04 to 0.06...
Advanced from frame 2 to 3 in 0.104 seconds,
with dt = 0.0001
Advancing solution starting at time 0.06 to 0.08...
Advanced from frame 3 to 4 in 0.104 seconds,
with dt = 0.0001
...
Advancing solution starting at time 1.96 to 1.98...
Advanced from frame 98 to 99 in 0.105 seconds,
with dt = 0.0001
Advancing solution starting at time 1.98 to 2...
Advanced from frame 99 to 100 in 0.106 seconds,
with dt = 0.0001
Simulation finished at time Thu Jun 1 10:19:14 2023Debugging#
Debugging is an inevitable fact of life when it comes to developing numerical codes (or any other software!). There are many different methods for debugging both C++ and Python projects, and the best method to choose is generally whichever is most comfortable to your own development process. Here are some methods I have been using to debug WARPXM simulations:
Excessive stdout#
Simply printing loads of information to the console is a pretty basic method, but it’s very often the quickest way to figure out what might be going wrong.
When working within the C++ warpxm code, there are logger streams set up which allow printing information to the console at different logging levels. The two logging levels you will generally use are the “info” and “debug” streams:
WxLogger* log = WxLogger::get("warpx-root.console");
WxLogStream infStrm = log->getInfoStream();
WxLogStream debStrm = log->getDebugStream();
infStrm << "This log will appear in stdout with verbosity set to 'info'\n";
debStrm << "This log will appear in stdout with verbosity set to 'debug'\n";
The log verbosity can be set as the verbosity parameter to a warpy.simulation, or directly within the .inp file.
When working with warpy modules in Python, you can just use the built-in print method to write to stdout at any point in your script. Python f-strings are a convenient way to format strings containing multiple variables:
print("This line will be printed to the console")
print(f"The time-stepping order is {torder} and the DG polynomial basis order is {sorder}")
Attaching Debugger: C++ in VS Code with gdb or lldb#
It is possible to configure VS Code to work as a fully-featured C++ debugger, using the ms-vscode.cpptools extension and a supported C++ debugger (either gdb or lldb).
- Prepare a WARPXM input file using
warpy.simulation.write(). - Set up a debugging configuration within your workspace’s
launch.json. If there is nolaunch.jsonin your workspace yet, you can simply create a new file named$(/path/to/warpxm/repo).vscode/launch.json. Add acppdbconfiguration to the file:
{
    "version": "0.2.0",
    "configurations": [
        {
            "name": "lldb warpxm",
            "type": "cppdbg",
            "request": "launch",
            // This is the path to the warpxm executable, automatically resolved by CMake Tools:
            "program": "${command:cmake.launchTargetPath}",
            // Path to the WARPXM input file you want to run
            "args": ["-i", "/warpxm/build/user_runs/evan_bluhm/examples/advection/advection.inp"],
            "stopAtEntry": false,
            // Set the current working directly when launching warpxm to the same folder as the input file
            "cwd": "${workspaceFolder}/build/user_runs/evan_bluhm/examples/advection",
            "environment": [
                {
                    // add the directory where our target was built to the PATHs
                    // it gets resolved by CMake Tools:
                    "name": "PATH",
                    "value": "${env:PATH}:${command:cmake.getLaunchTargetDirectory}"
                }
            ],
            "MIMode": "lldb",
            "setupCommands": [
                {
                    "description": "Enable pretty-printing for lldb",
                    "text": "-enable-pretty-printing",
                    "ignoreFailures": true
                }
            ]
        }
    ]
}- Make sure to select either the
DebugorRelWithDebInfovariant of the project. You can switch the CMake variant using theCMake: Select Variantcommand. Make sure to re-build after switching between variants! - Set a breakpoint anywhere in the code by clicking just to the left of the line numbers in the gutter.
- Press F5 or go to the “Run and Debug” menu to launch the new
lldb warpxmtarget. It will immediately launchwarpxm. When the running executable hits your breakpoint, it should immediately take your editor to the breakpoint, giving you the ability to view all local variables, step forwards through the code, and set additional breakpoints.
You can use the “Debug console” to evaluate gdb/lldb commands while paused at a breakpoint.
Attaching Debugger: C++ with Xcode#
Xcode is the development environment provided by Apple for developing system language applications on a Mac. In my opinion, it is the most user-friendly and performant among the free development environments available for Mac users. It is also very opinionated, and may feel strange if you are used to something like Visual Studio.
CMake is able to generate an Xcode workspace automatically if we pass the -G Xcode generator flag:
mkdir xcode-project
cd xcode-project
cmake -G Xcode /path/to/warpxm/git/repository
We should see some output like this while CMake locates the dependencies on our system and crafts an Xcode workspace for us:
-- The C compiler identification is AppleClang 14.0.3.14030022
-- The CXX compiler identification is AppleClang 14.0.3.14030022
-- Detecting C compiler ABI info
-- Detecting C compiler ABI info - done
-- Check for working C compiler: /Applications/Xcode.app/Contents/Developer/Toolchains/XcodeDefault.xctoolchain/usr/bin/clang - skipped
-- Detecting C compile features
-- Detecting C compile features - done
-- Detecting CXX compiler ABI info
-- Detecting CXX compiler ABI info - done
-- Check for working CXX compiler: /Applications/Xcode.app/Contents/Developer/Toolchains/XcodeDefault.xctoolchain/usr/bin/clang++ - skipped
-- Detecting CXX compile features
-- Detecting CXX compile features - done
-- compiler: AppleClang
-- Setting build type to 'Release' as none was specified.
-- Found MPI_C: /opt/homebrew/Cellar/open-mpi/5.0.0/lib/libmpi.dylib (found version "3.1")
-- Found MPI_CXX: /opt/homebrew/Cellar/open-mpi/5.0.0/lib/libmpi.dylib (found version "3.1")
-- Found MPI: TRUE (found version "3.1")
-- Performing Test CMAKE_HAVE_LIBC_PTHREAD
-- Performing Test CMAKE_HAVE_LIBC_PTHREAD - Success
-- Found Threads: TRUE
-- Metis library dir: /opt/homebrew/lib
-- Metis include dir: /opt/homebrew/include
-- Using mpiexec by default : /opt/homebrew/bin/mpiexec
-- Found HDF5: /opt/homebrew/Cellar/hdf5-mpi/1.14.3/lib/libhdf5.dylib;/opt/homebrew/opt/libaec/lib/libsz.dylib;/Applications/Xcode.app/Contents/Developer/Platforms/MacOSX.platform/Developer/SDKs/MacOSX13.3.sdk/usr/lib/libz.tbd;/Applications/Xcode.app/Contents/Developer/Platforms/MacOSX.platform/Developer/SDKs/MacOSX13.3.sdk/usr/lib/libdl.tbd;/Applications/Xcode.app/Contents/Developer/Platforms/MacOSX.platform/Developer/SDKs/MacOSX13.3.sdk/usr/lib/libm.tbd (found version "1.14.3")
-- Found PkgConfig: /opt/homebrew/bin/pkg-config (found version "0.29.2")
-- Checking for module 'PETSc'
--   Found PETSc, version 3.20.2
-- Linking with /opt/homebrew/Cellar/hdf5-mpi/1.14.3/lib/libhdf5.dylib;/opt/homebrew/opt/libaec/lib/libsz.dylib;/Applications/Xcode.app/Contents/Developer/Platforms/MacOSX.platform/Developer/SDKs/MacOSX13.3.sdk/usr/lib/libz.tbd;/Applications/Xcode.app/Contents/Developer/Platforms/MacOSX.platform/Developer/SDKs/MacOSX13.3.sdk/usr/lib/libdl.tbd;/Applications/Xcode.app/Contents/Developer/Platforms/MacOSX.platform/Developer/SDKs/MacOSX13.3.sdk/usr/lib/libm.tbd;metis;petsc;/opt/homebrew/Cellar/open-mpi/5.0.0/lib/libmpi.dylib;/opt/homebrew/Cellar/open-mpi/5.0.0/lib/libmpi.dylib
-- Found Python: /opt/homebrew/Frameworks/Python.framework/Versions/3.12/bin/python3.12 (found version "3.12.1") found components: Interpreter
-- LCOV_PATH not found
-- Could NOT find Doxygen (missing: DOXYGEN_EXECUTABLE)
-- Generating symbolic links
-- Configuring done (23.7s)
-- Generating done (0.2s)
-- Build files have been written to: /Users/evan/GitHub/warpxm/xcode-demo
If we open up Xcode (after installing it through the App Store, if not already installed), we are presented with the option to open an existing project:
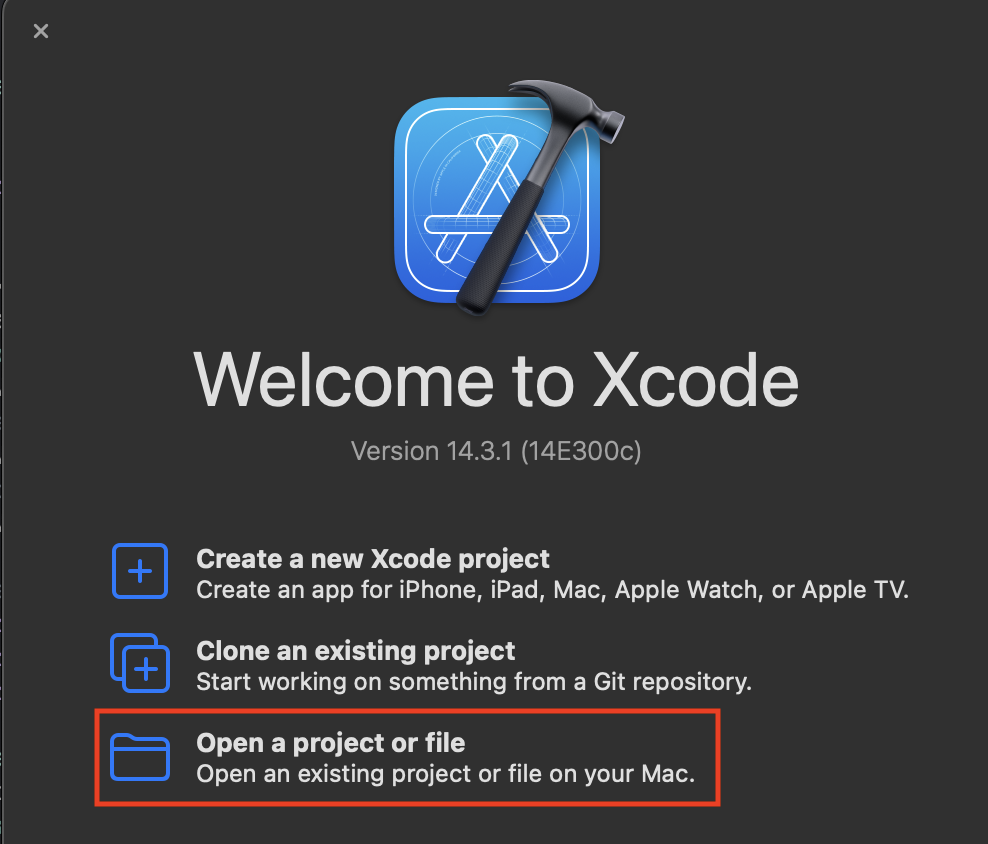
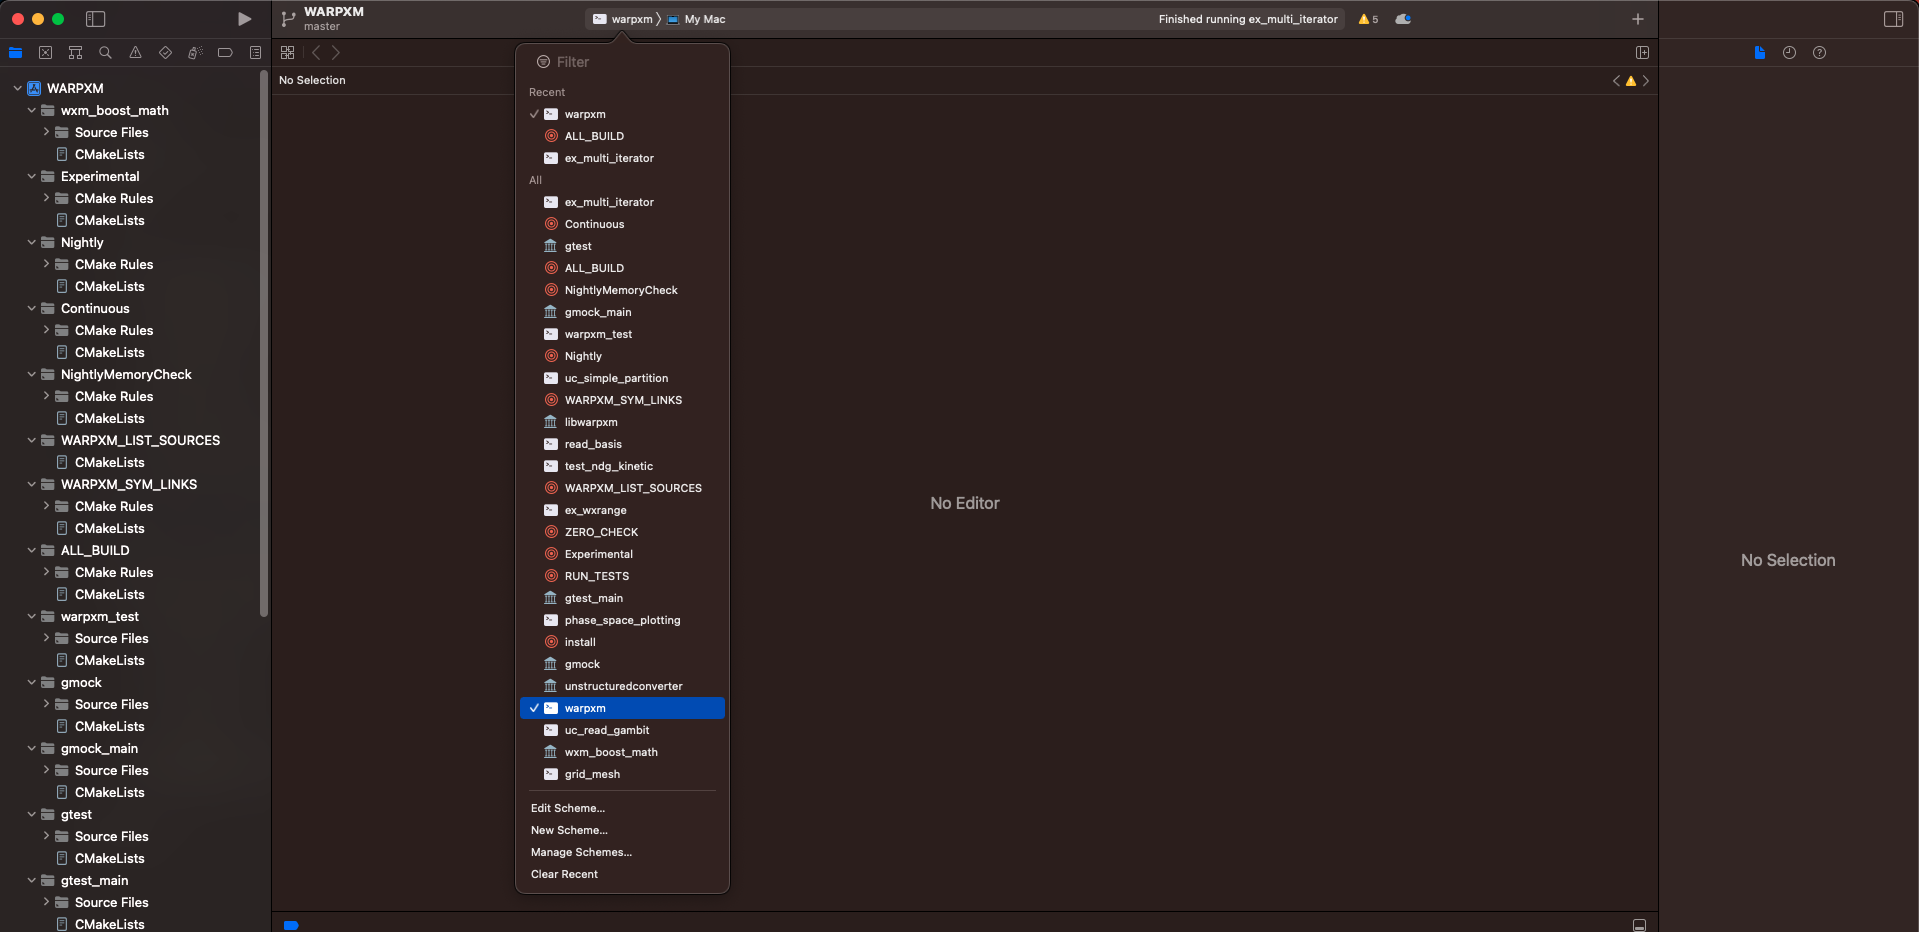
Navigate to the WARPXM.xcodeproj that CMake has created in the xcode-demo directory for us and open the project. We can use Xcode to build WARPXM as well as attach a debugger, so let’s go ahead and do that. After opening the project, click on the build target in the top navigation bar (or press Control + 0, that’s a zero not the letter O) and select warpxm as the build target.
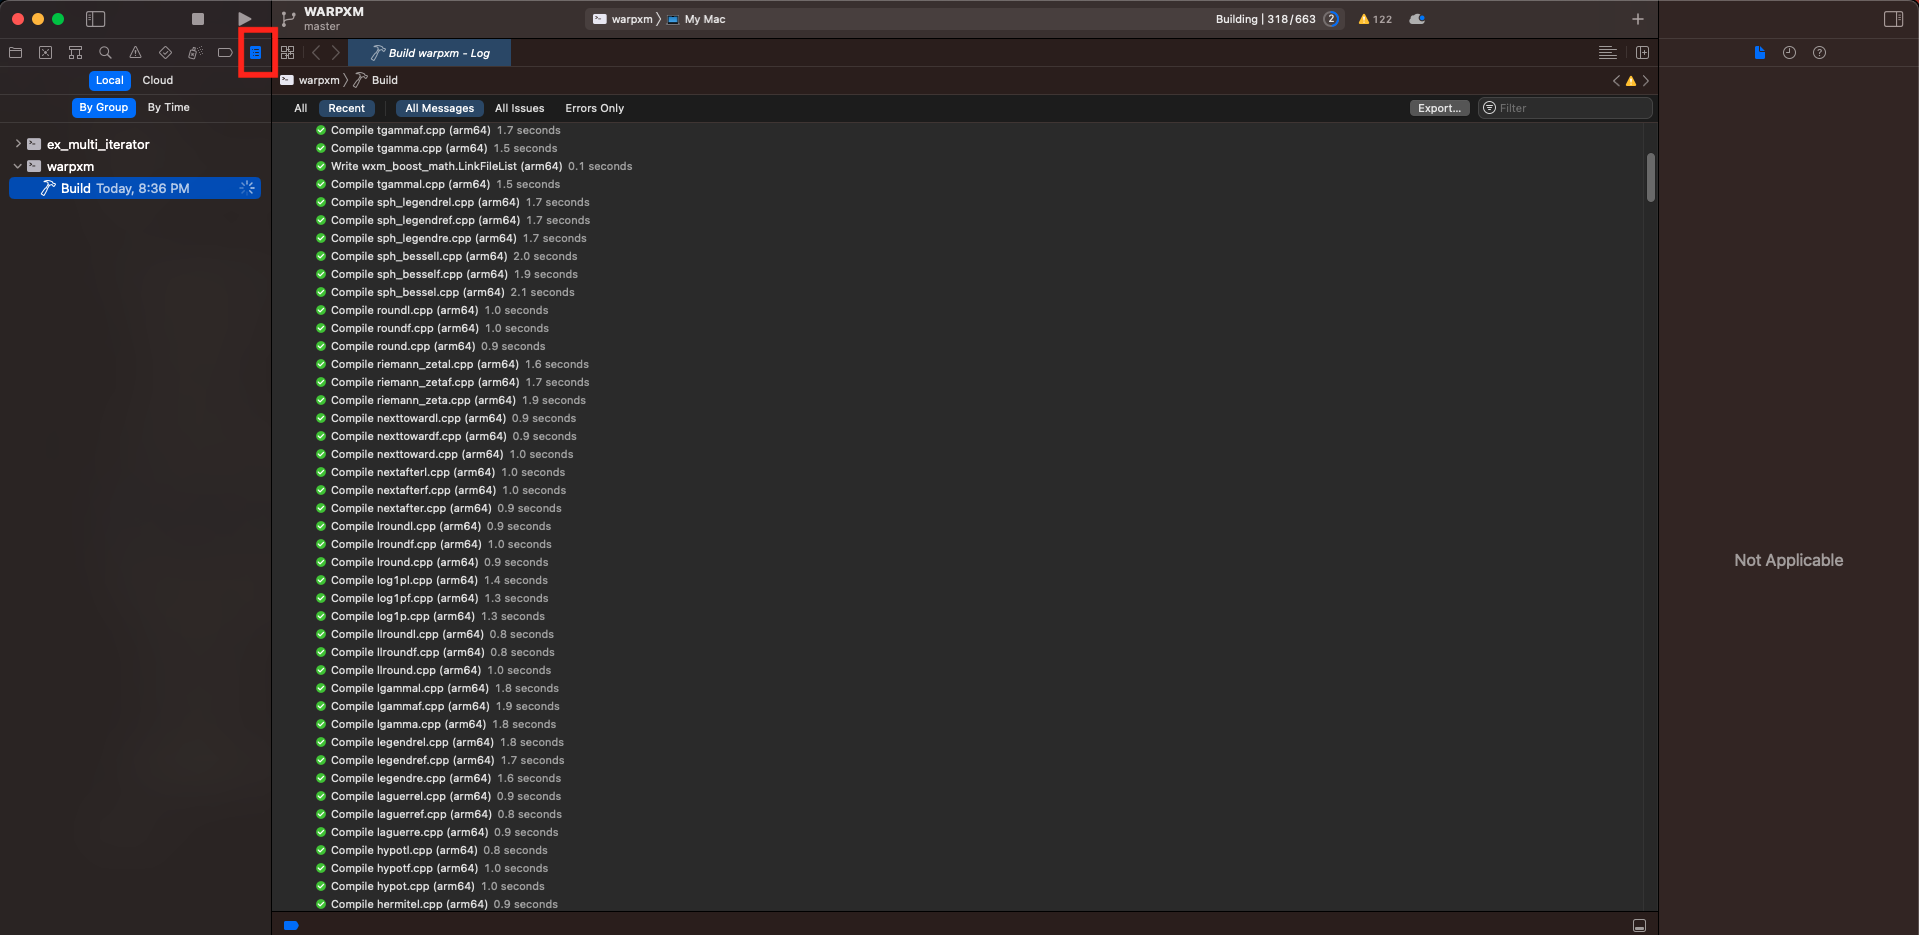
Then click the play triangle in the top-left navigation panel (or press Command + B) to build the project. You can view the build output by clicking on the report navigator panel (or pressing Command + 9):
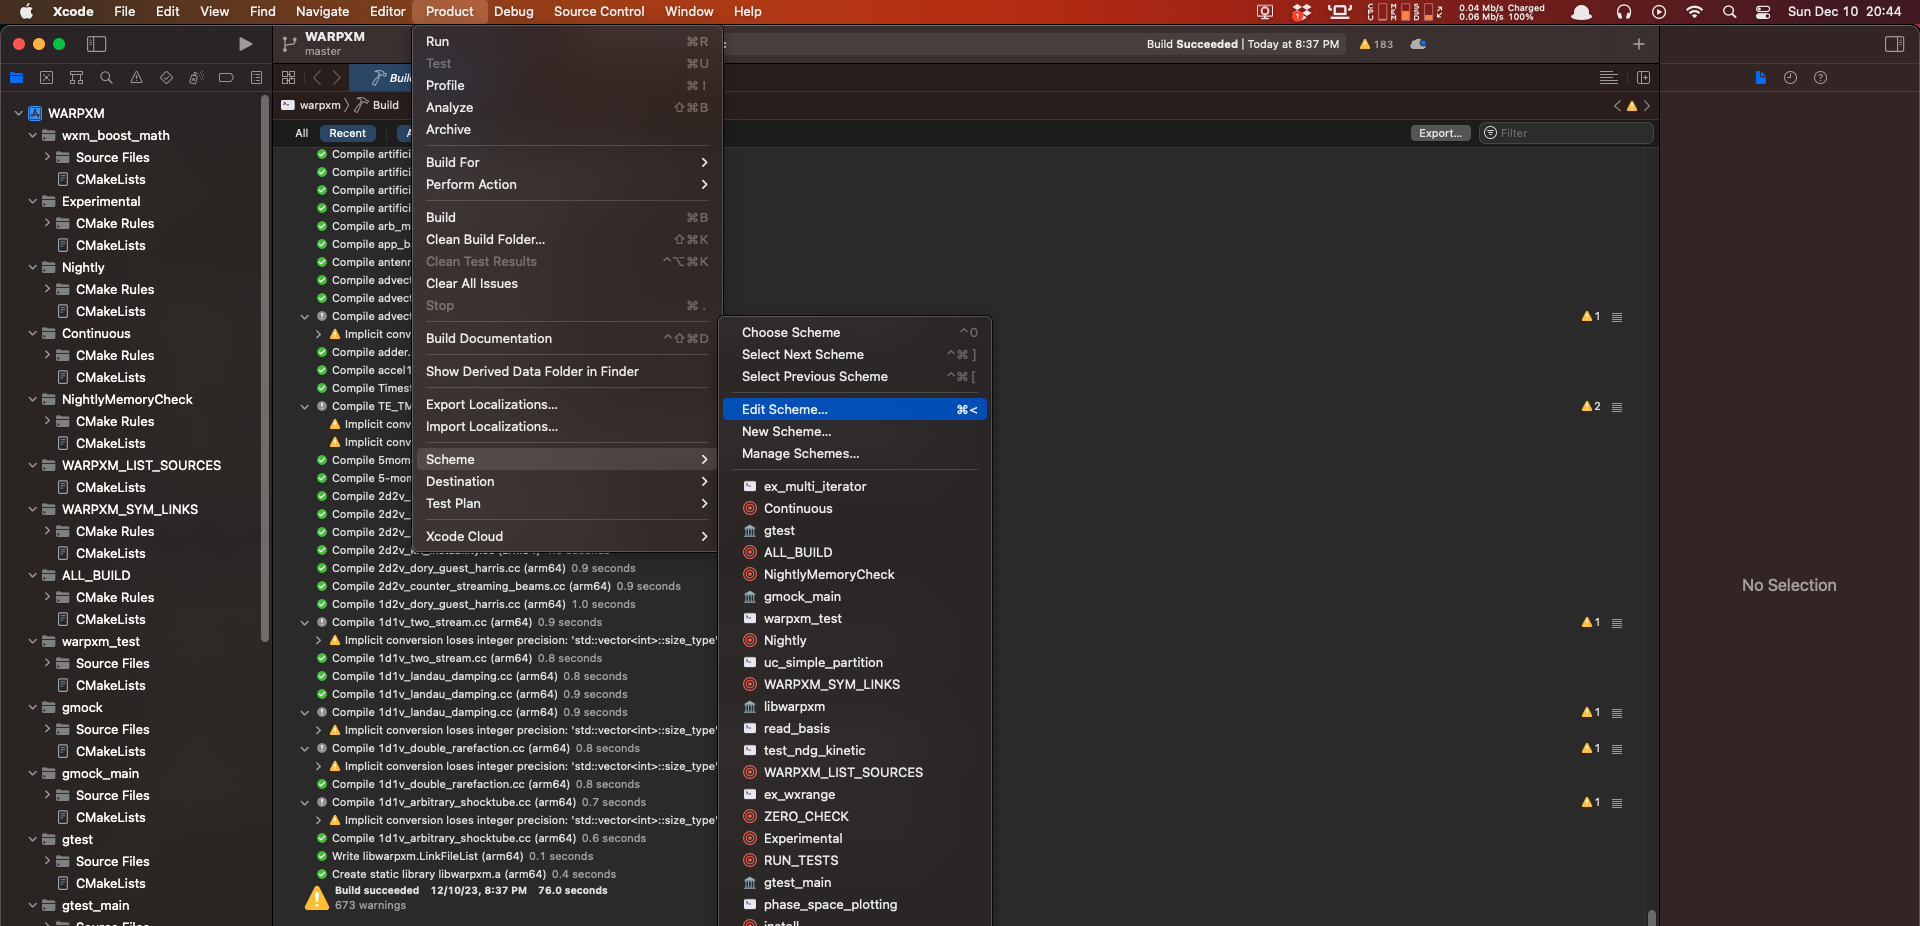
Once the build is complete, we can set breakpoints anywhere we choose, then point the freshly built warpxm at an input file and let it run. To specify an input file and working directory, use the Product -> Schemes -> Edit Scheme menu option (or press Command + <):
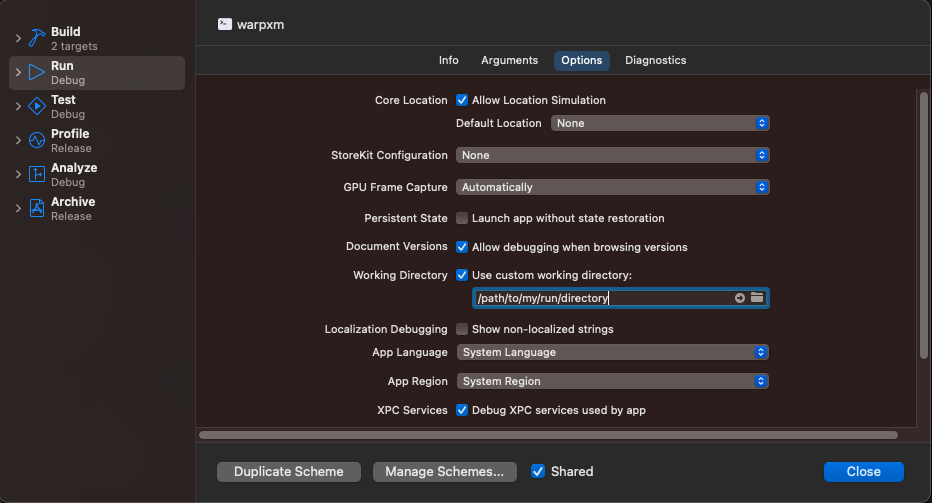
Under the Options panel, set the working directory to the same folder that your .inp input file is in. This will ensure that warpxm can find the meshes and other data associated with the sim when it runs.
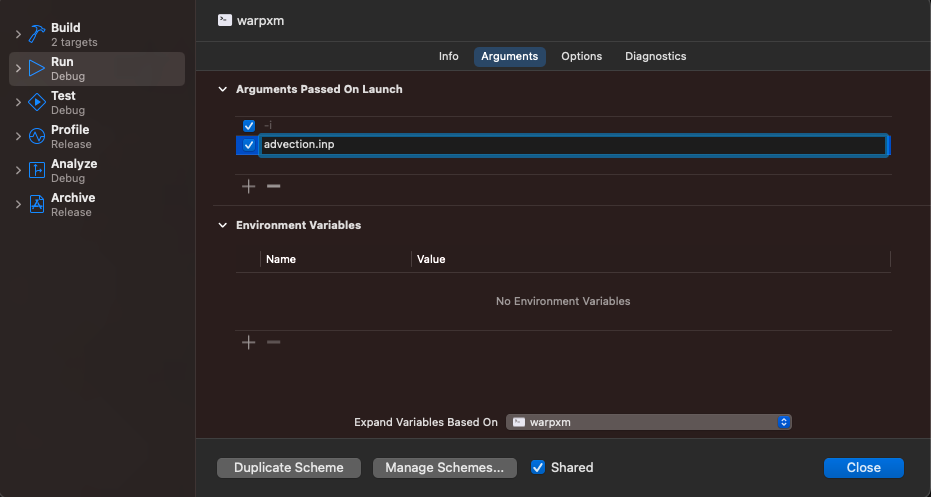
Then, in the Arguments panel, add the arguments to pass to the warpxm: -i for the first argument, and the name of your input file for the second argument
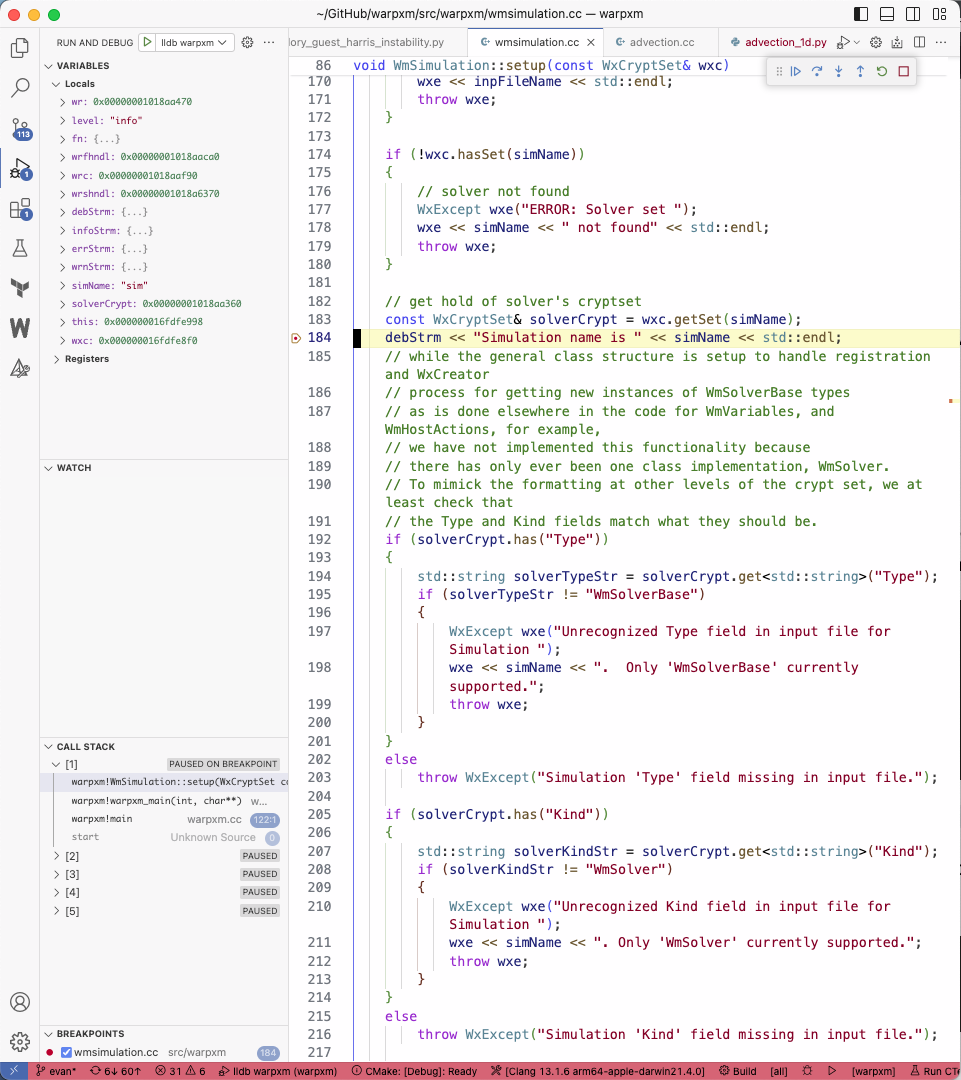
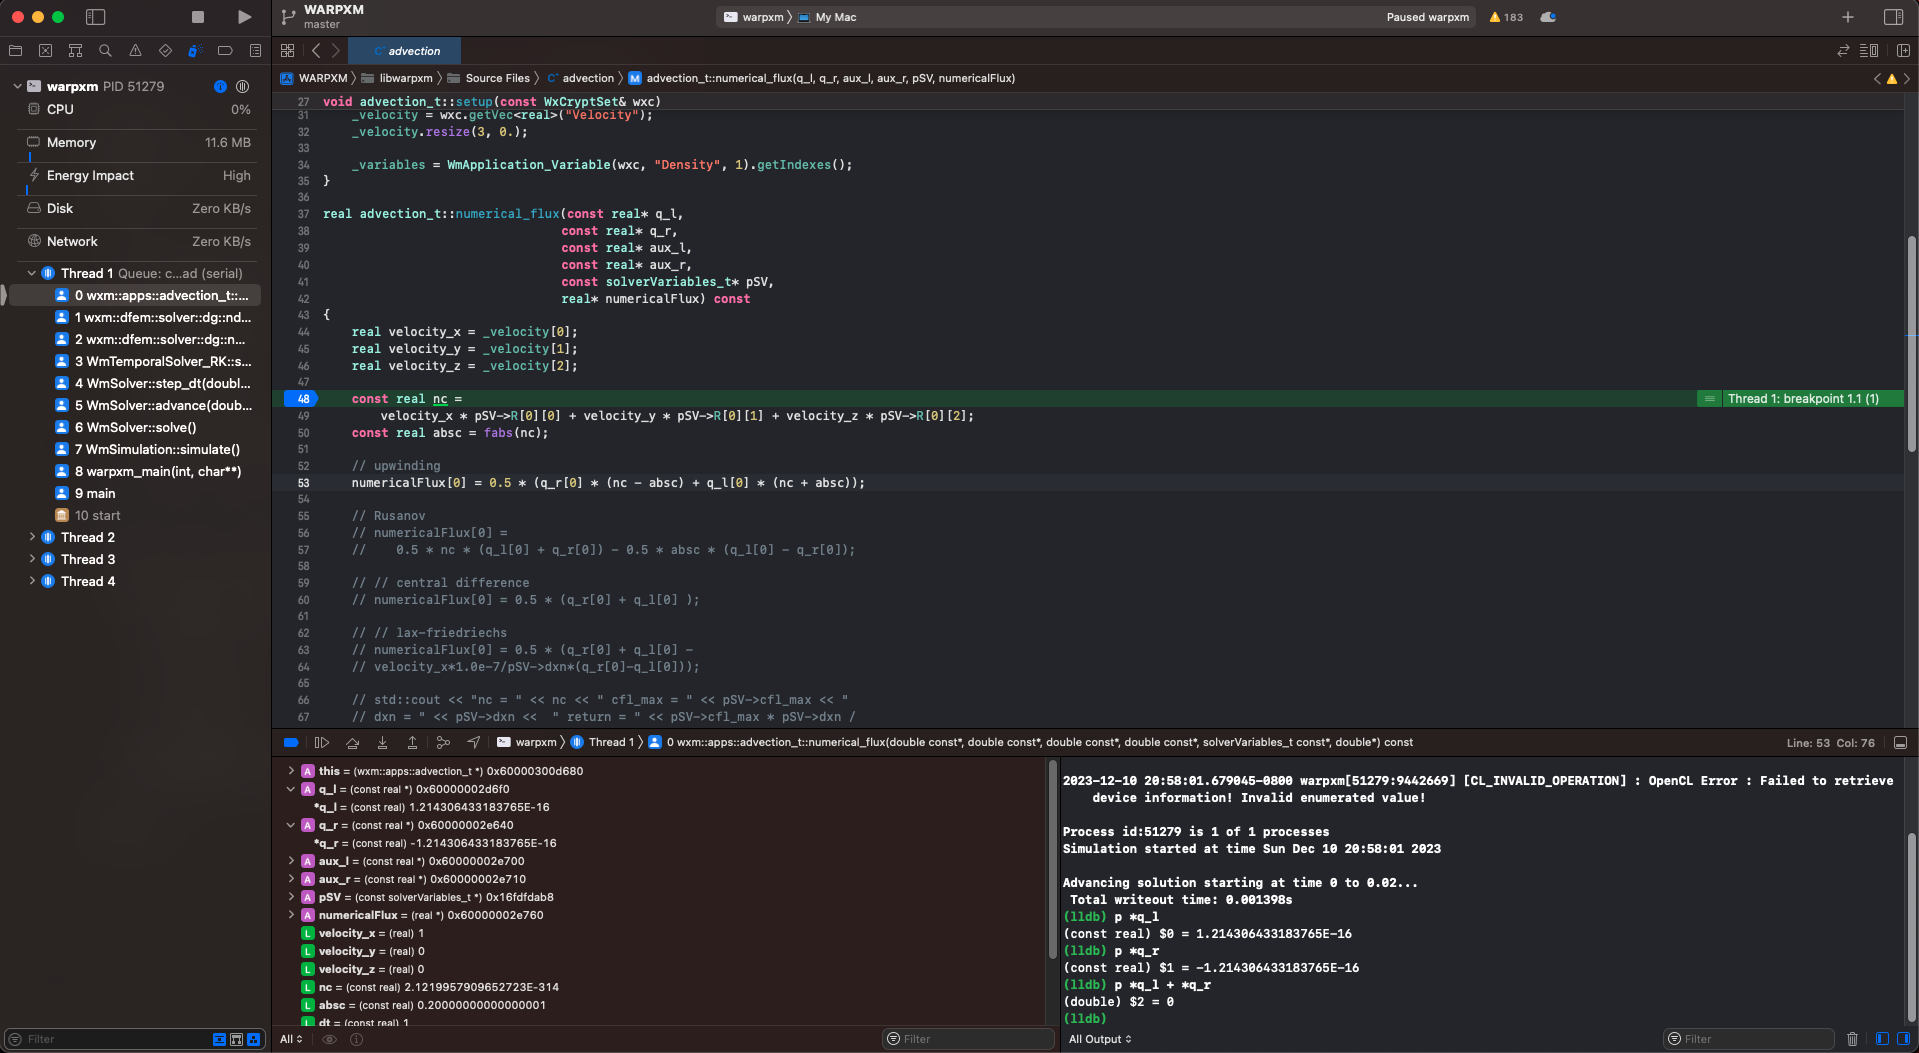
Close the menu. You can immediately begin debugging by pressing the play triangle in the top-left (or press Command + R) and Xcode will pause and break into the debugger if warpxm encounters an exception. Or, you can set a breakpoint by opening a source file (Command + Shift + O is the quickest way to do this, that’s the letter O not a zero) and clicking on the line number to set a breakpoint. Execution will pause when the statement is reached and you can view the current stack, the current value of each variable, and evaluate arbitrary lldb expressions. For example, if I use the advection example above and set a breakpoint within the numerical_flux function defined in src/apps/simple/advection.cc, I can view the value of the state variables in the debug area. Xcode also provides shortcuts for some common debugging expressions, in particular p is a shortcut for expr --, which takes any arguments, compiles them as though they were a source code expression written in the context of the current frame, executes the results, and prints the result:
Use the Debug menu to check out the hotkeys for stepping over, stepping into, and stepping out of expressions. Simply stepping through the code one statement at a time is great way to convince yourself that what you think should be happening is really happening!
Attaching Debugger: C++ with gdb or lldb#
If you prefer command-line utilities, or need to debug WARPXM running in an environment like Hyak where a graphical user interface is not available, gdb and lldb are the standard, reliable C++ debuggers to go for. I don’t have an x86 CPU on my machine, so I can’t use gdb, but there is a fairly straightforward mapping between gdb and lldb commands and capabilities, and they are largely interchangeable.
WARPXM has some basic suport for pausing execution to allow for setting breakpoints before actually running a simulation. Passing the -debug flag to WARPXM will pause execution before any setup has finished, allowing you to attach a debugger at your leisure before continuing
- Launch WARPXM process with debug flag
- In your warpy input file, add
-debugto the list of arguments to pass towarpxmwhen you callsim.run():sim.run('example', (...more_arguments), wxm_args=['-debug']) - Or, if you want to run
warpxmdirectly from the command line, simply add-debugto the list of arguments'/path/to/build/bin/warpxm' -in 'input_file.inp' -debug - Either way, you will end up with a warpxm process that waits for the debugger to attach and also lets you know the process ID (PID) to attach to:
Execution command is: /path/to/build/bin/warpxm -debug -i /path/to/example/input_file.inp Process id:74639 is 1 of 1 processes waiting for debugger... - In a separate command window, attach your debugger to the PID of the warpxm process. For
lldb, the syntax to attach to the running process is:$ lldb -p 74639 (lldb) process attach --pid 74639 Process 74639 stopped * thread #1, queue = 'com.apple.main-thread', stop reason = signal SIGSTOP frame #0: 0x00000001048efe08 warpxm`WmSimulation::parseCmdLine(this=0x000000016b7ecee0) at wmsimulation.cc:366:24 363 // wait for debugger 364 volatile bool wait = true; 365 std::clog << "waiting for debugger..." << std::endl; -> 366 while (wait) 367 { 368 // attach a debugger to desired processes, then on rank 0 set the 369 // variable wait to false in gdb, this is: `set wait=false` Target 0: (warpxm) stopped. Executable module set to "/Users/evan/GitHub/warpxm/build/bin/warpxm". Architecture set to: arm64-apple-macosx-. (lldb) - Set a breakpoint at the location you want to halt execution. For example, to halt when the function
WmSimulation::simulatebegins, say(lldb) breakpoint set --name simulate Breakpoint 1: where = warpxm`WmSimulation::simulate() + 24 [inlined] std::__new_allocator<char>::__new_allocator() at new_allocator.h:88:49, address = 0x00000001048ef290 - Continue execution by setting the value
wait=false, as suggested in the comment(lldb) expr wait=false (volatile bool) $0 = false (lldb) process continue Process 74639 resuming Process 74639 stopped * thread #1, queue = 'com.apple.main-thread', stop reason = breakpoint 1.1 frame #0: 0x00000001048ef298 warpxm`WmSimulation::simulate(this=0x000000016b7ecee0) at wmsimulation.cc:231:79 228 229 void WmSimulation::simulate() 230 { -> 231 WxLogStream debStrm = WxLogger::get("warpx-root.console")->getDebugStream(); 232 WxLogStream infStrm = WxLogger::get("warpx-root.console")->getInfoStream(); 233 debStrm << "Running simulation...\n"; 234
Attaching Debugger: Python in VS Code with debugpy#
Similar to using the C++ extension to use VS Code as a C++ debugger, you can use the built-in Python extension to do the same for warpy modules.
- Set up a debugging configuration within your workspace’s
launch.json. If there is nolaunch.jsonin your workspace yet, you can simply create a new file named$(/path/to/warpxm/repo).vscode/launch.json. Add acppdbconfiguration to the file:
{
    "version": "0.2.0",
    "configurations": [
        {
            "name": "Debug python file",
            "type": "python",
            "request": "launch",
            // Path to the warpy script you want to launch and debug
            "program": "build/user_runs/evan_bluhm/examples/advection_1d.py",
            "console": "integratedTerminal",
            "justMyCode": false
        },
    ]
}- Set a breakpoint anywhere in the code by clicking just to the left of the line numbers in the gutter.
- Press F5 or go to the “Run and Debug” menu to launch the new “Debug python file” target. It will immediately run the warpy script in the integrated terminal. When the running executable hits your breakpoint, it should immediately take your editor to the breakpoint, giving you the ability to view all local variables, step forwards through the code, and set additional breakpoints.
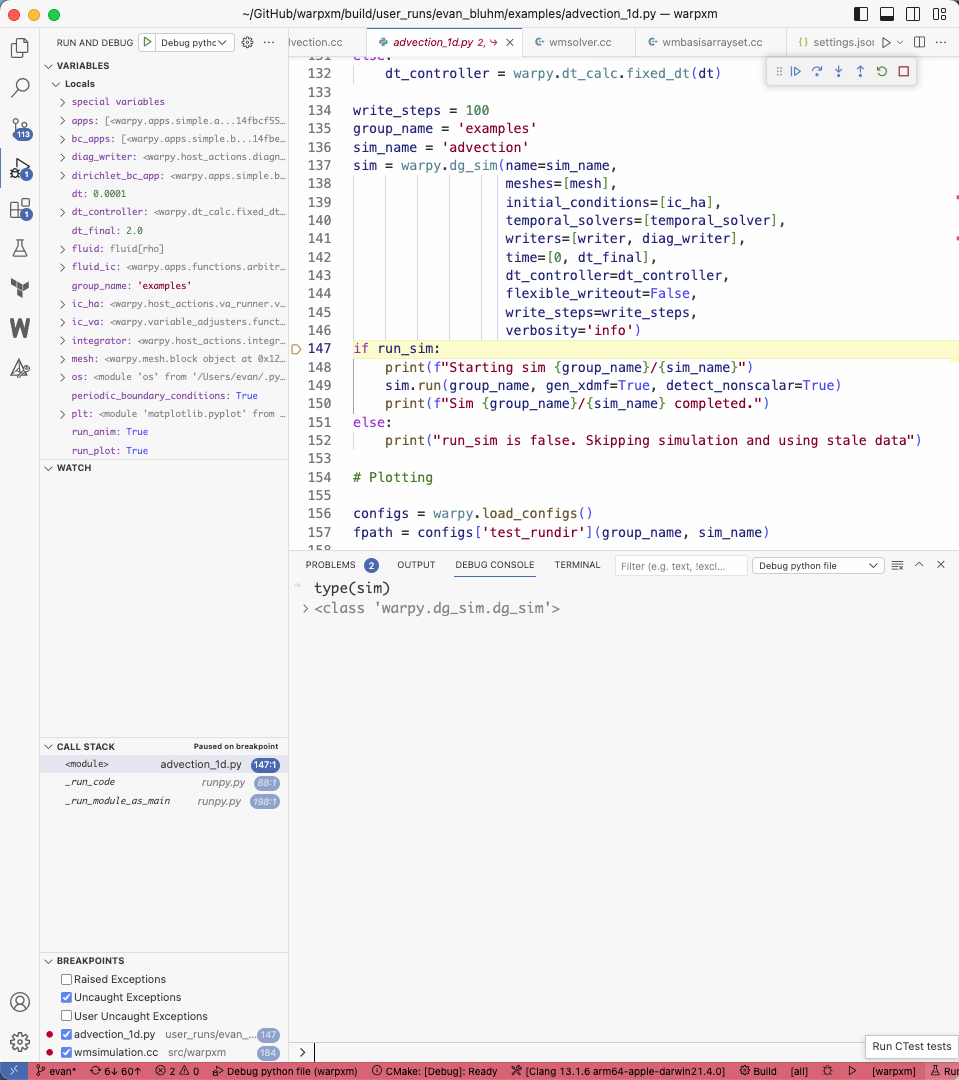
You can use the “Debug console” to evaluate arbitrary expressions while paused at a breakpoint.
Attaching Debugger: pdb#
The built-in command-line Python debugger module pdb can be used to debug Python scripts at the command-line. Simply insert this line wherever you would like to break execution:
import pdb; pdb.set_trace()and launch your script. Execution will pause at the breakpoint:
python examples/advection_1d.py
> /Users/evan/GitHub/warpxm/build/user_runs/evan_bluhm/examples/advection_1d.py(149)<module>()
-> if run_sim:
(Pdb)
You can now run pdb commands. Type ? to see a list of available commands:
(Pdb) ?

Documented commands (type help <topic>):
========================================
EOF    c          d        h         list      q        rv       undisplay
a      cl         debug    help      ll        quit     s        unt
alias  clear      disable  ignore    longlist  r        source   until
args   commands   display  interact  n         restart  step     up
b      condition  down     j         next      return   tbreak   w
break  cont       enable   jump      p         retval   u        whatis
bt     continue   exit     l         pp        run      unalias  where

Miscellaneous help topics:
==========================
exec  pdb
You can view the current value of any variable by typing its name, or using the print() function:
(Pdb) write_steps
100